7. Configure Plug&Charge
This is a guide for how to configure EVerest to enable its Plug&Charge functionalities. For a tutorial on how to do Plug&Charge in the EVerest SIL, please refer to How To: Plug&Charge with EVerest Software in the loop.
7.3. Involved EVerest modules
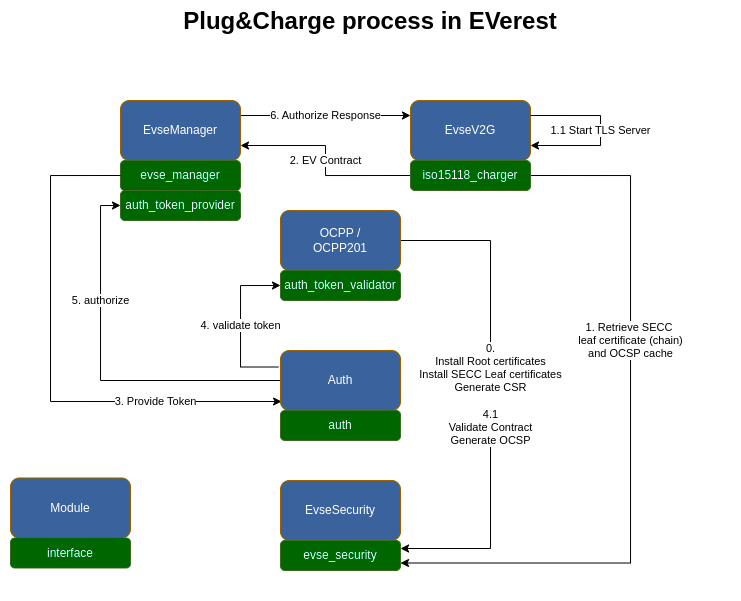
The E2E Plug&Charge process involves communication from the EV to systems in the cloud. The main protocols involved are ISO15118 and OCPP. In EVerest, several modules and interfaces are involved in the Plug&Charge process. Here is an overview of how everything comes together in EVerest:
Note
This visualization only presents the interfaces and connections between them that are relevant for Plug&Charge.
Let’s have a look step by step:
7.3.1. Step 0
Before a Plug&Charge session can start, the following certificates and keys should be installed on the charger:
V2G Root certificate
SECC Leaf certificate
SECC Leaf private key
MO Root certificate (optional)
These certificates and keys can be installed during provisioning of the charger, or they can be installed using OCPP1.6 or OCPP2.x. The paths to store these files can be configured in the EvseSecurity module. Please see Documentation of the EvseSecurity for further information on how to do the configuration for this module.
In the visualization, step (0) shows the process that represents the previously described process of provisioning the charger with the correct certificates, before there is a physical connection to the EV. The OCPP/OCPP201 and EvseV2G module require a module that implements the evse_security interface, in order to execute the following commands:
install_ca_certificate (Used by OCPP to install root certificates. This process is initiated by the OCPP CSMS)
update_leaf_certificate (Used to install or update SECC leaf certificates)
generate_certificate_signing_request (Used to generate a CSR that is used in the SignCertificate.req of OCPP)
verify_certificate (Used by EvseV2G to verify the contract certificate and by OCPP to verify new leaf certificates)
get_mo_ocsp_request_data (Used by EvseV2G and OCPP to get the OCSP request data of the contract certificate (chain))
There are more commands provided by the evse_security interface, which are not included in the Plug&Charge process.
For a successful Plug&Charge authorization process, the following certificates need to be installed on the charger:
SECC leaf certificate (including sub cas)
V2G Root Certificate(s)
MO Root Certificates(s) (only if the EV contract shall be verified locally). This can be controlled by the OCPP configuration keys described in the section OCPP 1.6 and OCPP 2.x configuration for more information.
As mentioned above, these certificates can be installed manually or by the CSMS. In case Plug&Charge is enabled and no (valid) SECC leaf certificate is installed or it expires within the next 30 days, the charging station will attempt to retrieve a SECC leaf certificate from the CSMS automatically. This process can also be triggered manually by the CSMS by using a TriggerMessage(SignCertificate).req message.
7.3.2. Step 1
This step is triggered by a physical connection between the EV and the charger. A TLS connection is required between the EV and the charger to allow Plug&Charge, so the EvseV2G module retrieves the SECC leaf certificate chain and private key from via the evse_security.yaml interface and sets up a TLS server, to which the EV can connect as a TLS client.
7.3.3. Step 2
When charger and EV have agreed on Contract being the selected payment option, we have something going on that we can call a Plug&Charge process. The EV sends its contract certificate chain and requests authorization from the charger. The EvseV2G module generates a ProvidedIdToken, which is the EVerest type that contains data about the authorization request, including the contract certificate and OCSP request data.
The ProvidedIdToken is transmitted via the evse_manager interface to the EvseManager module.
7.3.4. Step 3
The EvseManager module implements the token_provider interface and can therefore publish the ProvidedIdToken containing the contract certificate and OCSP data within EVerest to the central authorization module in EVerest: Auth.
7.3.5. Step 4
The Auth module sends commands containing the ProvidedIdToken to its registered token_validator(s), which are OCPP/OCPP201 in the case of Plug&Charge. The OCPP module(s) validate the token based on the requirements specified in the OCPP protocol (either validating locally or by the CSMS).
7.3.6. Step 5
In case the validation was successful, the Auth module notifies the EvseManager using the authorize command, that authorization is present and the charging session can be started.
7.3.7. Step 6
The EvseManager forwards the authorization response to the EvseV2G module, which can then send the awaited ISO15118 response to the EV.
Note
We have taken some shortcuts and ignored some further communication going on during the full process, but these steps cover what’s important for Plug&Charge in EVerest.
7.4. EVerest configuration
Now that we know everything comes together for Plug&Charge in EVerest, we can have a look at how this is actually configured.
The following two configuration files are relevant and require a correct setup and activation for Plug&Charge:
EVerest configuration file (yaml)
OCPP configuration file (json) for OCPP 1.6 or OCPP 2.x
Let’s start with the EVerest configuration file. If you haven’t read Explaining the YAML files, now it’s the right time to do it before you go on!
It’s a good idea to start with a base of a configuration file and talk about the changes required to enable Plug&Charge. The base config we use is the “config-sil-ocpp201.yaml”, which already contains the configuration for OCPP2.x.
We need to take a closer look at the configuration of the EvseManager, EvseV2G, Auth and EvseSecurity.
7.4.1. EvseManager
In case of AC, make sure that ac_hlc_enabled is set to true in order to allow ISO15118 communication
Make sure payment_enable_contract is set to true
7.4.2. EvseV2G
Make sure tls_security is set to allow or force.
If verify_contract_cert_chain is true the EvseV2G module attempts to verify the contract certificate chain
locally. It is recommended to set this to false, because this validation is also executed and handled in OCPP.
7.4.3. Auth
Make sure the EvseManager module is listed as a connection of token_provider. This is important, because only
in this case the ProvidedIdToken including the contract certificate is actually received by the Auth module. * Make sure the OCPP module is configured as the single token_validator.
7.4.4. EvseSecurity
Please refer to Documentation of the EvseSecurity module for information on the ISO15118 configuration.
7.5. OCPP 1.6 and OCPP 2.x configuration
Since Plug&Charge has been backported from OCPP 2.x to OCPP 1.6, the configuration options to control the process are mostly identical. These options are described in the following section, where differences between OCPP 1.6 and OCPP 2.x are marked.
These OCPP configuration options are relevant for the Plug&Charge process:
ISO15118CertificateManagementEnabled (bool): Global feature flag to enable certificate management using ISO15118. This enables the ISO15118 message handling via the DataTransfer mechanism according the the OCPP1.6 Plug&Charge Whitepaper. (only required for OCPP1.6, OCPP2.x does not require this option).
ISO15118PnCEnabled (bool): Global feature flag to enable authorization using contract certificates.
CentralContractValidationAllowed (bool): If enabled and charging station can not validate the contract locally (e.g. because no MO root certificate is installed), the charging station provides the contract certificate as part of the Authorize.req so that the CSMS can verfiy the contract instead.
ContractValidationOffline (bool): If enabled, the charging station will try to validate a contract certificate when it is offline using the authorization cache or the local authorization list. If this is set to false, Plug&Charge will fail if the charging station is offline.
ISO15118Ctrlr::V2GCertificateInstallationEnabled (bool, only OCPP2.x): Allows the CSMS to install an SECC leaf certificate on the charging station. This must be enabled in case the charging station shall receive the SECC leaf certificate from the CSMS.
ISO15118Ctrlr::ContractCertificateInstallationEnabled (bool, only OCPP2.x): Allows contract certificate installation installtion/update in the EV via ISO15118.
The following configuration options control parameters of the certificate signing request that is initiated by the charging station automatically in case Plug&Charge is enabled and no (valid) SECC Leaf Certificate is currently installed.
SeccLeafSubjectCommonName (string, ISO15118Ctrlr::SeccId in OCPP 2.x)
SeccLeafSubjectCountry (string, ISO15118Ctrlr::CountryName in OCPP 2.x)
SeccLeafSubjectOrganization (string, ISO15118Ctrlr::OrganizationName in OCPP 2.x)
These configuration keys can be configured manually or controlled by the CSMS according to its needs. If the CSMS rejects the CSR from the charging station or does not return a certificate after the specified timeouts and retries, it is likely that the values of these configuration keys do not match the expectations of the CSMS. Contact your CSMS partner in this case.