4. EVerest Modules in Detail
This section gives you a bunch of theoretical input about the EVerest module concept.
Other ways to approach the concepts of EVerest module development are:
For a very first glance and understanding of EVerest modules, try to check the Module Setup section in the Quick Start Guide.
A more hands-on intro to EVerest module development is the Tutorial About Developing EVerest Modules.
4.1. Overview
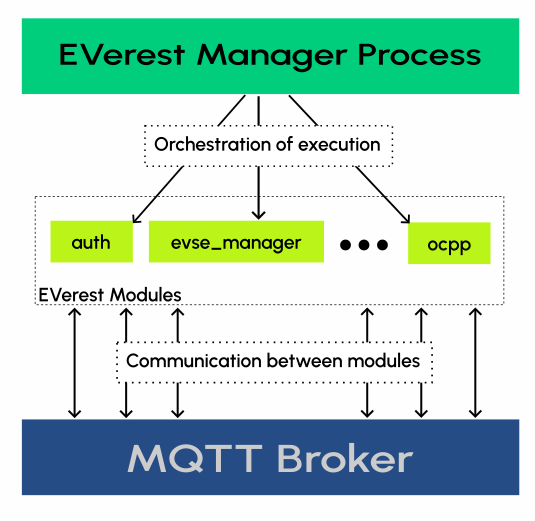
EVerest follows a microservice-like architecture. A typical EVerest deployment consists of the following components:
Several module instances, which are separate processes offering some type of functionality;
An MQTT broker (mosquitto), which provides the backbone of communication between module instances;
A manager process, which orchestrates the execution of module instances.
Note
EVerest provides integration for modules written in C++, Javascript, Python or Rust. We will use notation for C++ below.
4.2. Concepts
4.2.1. Modules and module instances
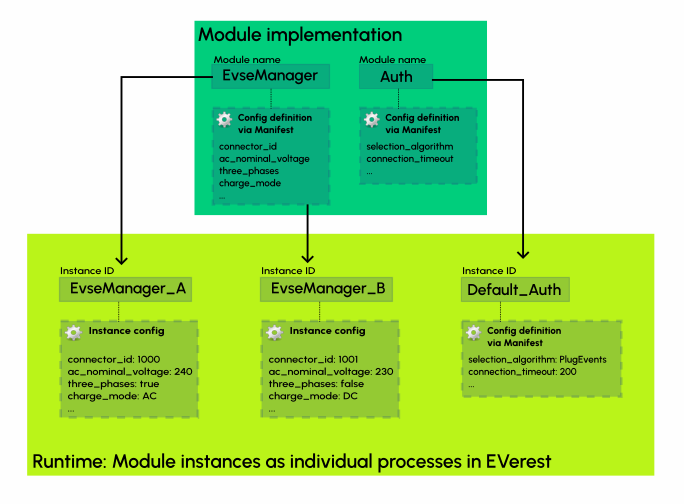
A module is a program providing a specific functionality within EVerest, e.g. driving a particular type of hardware.
Each module has a unique name, assigned at development time. Modules can accept config values, which can be set when executing the module.
In an EVerest deployment, you launch instances of these modules, each instance is a separate process.
There can be multiple instances of the same module, e.g. for driving multiple devices of the same type.
Each module instance has a unique instance ID, independent of the module name, which is assigned when configuring the deployment.
Different instances of the same module can also have different config values set when configuring the deployment.
4.2.2. Interfaces: Communication between modules
Think of interfaces as specific protocols (or languages) that modules can use to communicate with each other.
An interface is a set of:
Commands: Synchronous (remote) procedure calls with defined arguments and return values - in short CMDs;
Variables: Useful for asynchronous communication, a variable is a topic (typically some particular value that changes over time) which users of the interface can subscribe to, and which the module publishes updates on. In short VARs.
For example, imagine a simple interface offered by a power supply module.
Turning power on or off could be implemented as CMDs, callable by other modules.
The voltage and current values at the power supply could be implemented as a VAR - the power supply module publishes this VAR regularly, and other modules could subscribe to the VAR and observe its value over time.
4.2.3. Providing and requiring interfaces
Each module defines a set of interface implementations it provides to other modules, and a set of interface implementations it requires from other modules.
4.2.3.1. Providing interface implementations
A module is not simply declared as an implementor of an interface. Instead, modules have a set of interface implementations, each implementing one interface and having a unique implementation ID. This is done because a module can implement the same interface multiple times. This is reflected by providing multiple implementations with different IDs for the same interface.
As an analogy, think of an internet router. It does not just implement the IP protocol, it has multiple implementations of it (several Ethernet ports, WLAN antennas, etc.), which can be connected to different devices, and may even have different purposes, e.g. LAN and WAN ports.
4.2.3.2. Requiring interface implementations
Just like a module can provide the same interface multiple times, it can also require multiple implementations of the same interface. For example, there could be one energy manager component, which communicates with multiple power supply or EVSE manager modules.
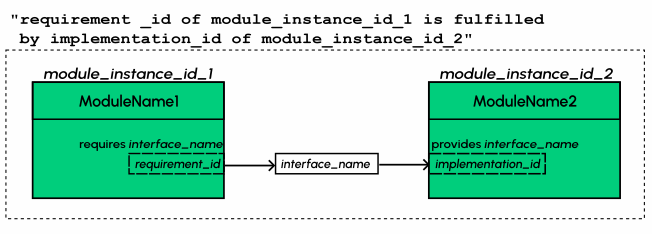
Therefore, modules have a set of interface requirements with unique IDs, each of which is for a particular interface and must be satisfied by an interface implementation of another module.
Continuing with the router analogy from before, a PC can have multiple network interfaces - e.g. one WLAN and one Ethernet - which could easily be connected to different ports on different routers.
The following diagram shows how providing and requiring interface implementation create relations between modules:
4.2.4. Interface communication on the MQTT layer
On the MQTT level, interfaces are implemented as follows:
To listen for incoming CMDs or subscribe to a VAR, a module subscribes to the corresponding MQTT topic;
To send a CMD or update to a VAR, a module publishes a message on the corresponding topic.
The MQTT topic for commands is:
everest/{module instance ID}/{interface implementation ID}/cmd
Similarly, the MQTT topic for variables is:
everest/{module instance ID}/{interface implementation ID}/var
Note that the path prefix everest may differ in some end-to-end tests.
4.2.5. Wiring it all together: The run configuration
The run configuration is a YAML file which specifies the structure of your deployment. The run configuration defines the module instances to start:
Their instance IDs;
Which modules they are an instance of;
What to set their configuration values to;
- For each interface requirement of the module instance:
The instance ID of the module instance which provides the interface;
The interface implementation ID within the providing module which will be used.
4.3. Explaining the YAML files
Now, we will show how the concepts above map to the YAML files defining modules and interfaces.
Consider the following example: We want two modules, a “ping server” and a “ping client”, to communicate over a “ping interface”.
Let us define the interfaces/interface_ping.yaml first:
description: Interface for a ping-pong interaction
cmds: # list of commands in the interface
  command_ping: # name of the command
    description: Send a ping with a payload to the ping server.
    arguments: # list of arguments
      payload:
        description: An arbitrary string that the server will pong back.
        type: string
    result: # return value of the command
      description: The same payload as the ping
      type: string
vars: # list of variables in the interface
  var_nping: # name of the variable
    description: The number of pings the server has received so far
    type: integer
Now, let us define a “ping server” module, which has an implementation of this interface.
Here is the modules/PingServerModule/manifest.yaml file:
description: Example ping-pong module
config: # list of config values
  cfg_publish_number_of_pings: # name of the config value
    description: Publish the number_of_pings variable every 5 seconds.
    type: boolean
    default: false
provides: # list of interface implementations
  if_impl_id_ping: # implementation ID
    interface: interface_ping # interface name
    description: Responds to a ping with a pong
enable_external_mqtt: true # enable this if you want to use the MQTT layer directly in your code
metadata:
  license: link-to-your-license.here
  authors:
    - Max Mustermann, Company Name Here
We can have a “ping client” module, which requires the ping_interface.
Here is the modules/PingClientModule/manifest.yaml file:
description: Example ping-pong client module
provides: # list of interface implementations
  if_impl_id_empty: # there must be at least one, so we add a dummy interface
    interface: empty # the definition of this interface is in everest-core
    description: Dummy interface
requires: # list of interface requirements
  requirement_ping_server: # requirement ID
    interface: interface_ping # interface name
enable_external_mqtt: true # enable this if you want to use the MQTT layer directly in your code
metadata:
  license: link-to-your-license.here
  authors:
    - Max Mustermann, Company Name Here
And finally, we define a run configuration, where instances of the two modules connect to each other:
settings:
  telemetry_enabled: true
active_modules: # list of module instances
  instance_id_ping_server: # instance ID
    config_module: # list of config parameters
      cfg_publish_number_of_pings: true
    module: PingServerModule # module which this is an instance of
  instance_id_ping_client: # next instance ID
    connections: # list of providers for interface requirements
      requirement_ping_server: # requirement ID
        - implementation_id: if_impl_id_ping # implementation ID
          module_id: instance_id_ping_server # module instance ID of the provider
    module: PingClientModule # module which this is an instance of
Graphically, this would look as follows:
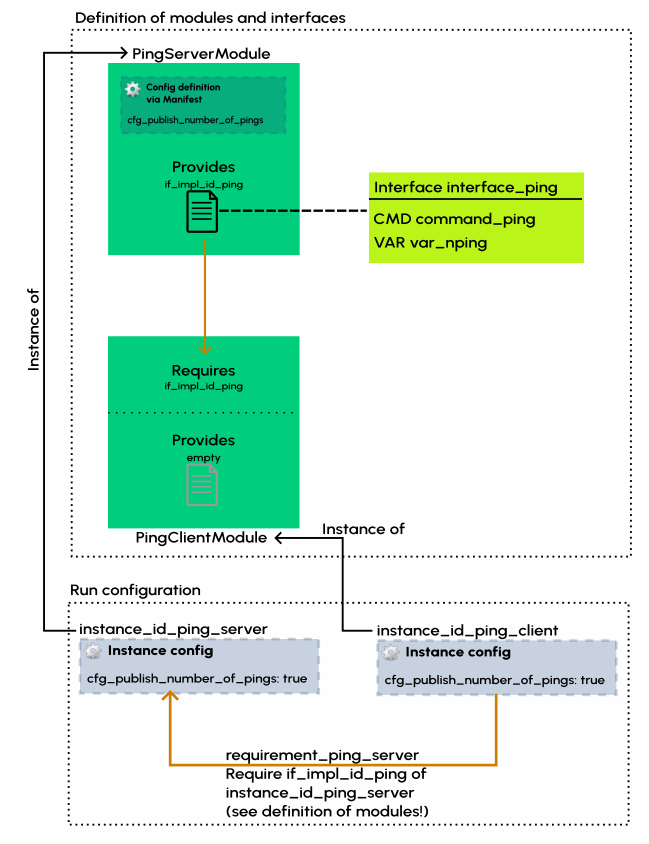
For a tutorial where you implement and experiment a similar example, refer to this EVerest module development tutorial.
4.4. Explaining the generated sources
When starting a project, you will typically use ev-cli to generate a
source code skeleton.
Here, we will explain the purpose and structure of the files created by this code generation step.
4.4.1. Interface headers
Using ev-cli generate-headers for the interface_ping from above,
three header files are generated:
.
└── build
    └── generated
        └── include
            └── generated
                └── interfaces
                    └── interface_ping
                        ├── Implementation.hpp
                        ├── Interface.hpp
                        └── Types.hpp
We will not list the contents of these files completely, but we will explain the contents of the files generally.
Interface.hpp contains a class called interface_pingIntf
(in general, ${INTERFACE_NAME}Intf),
which is used when requiring the interface.
It contains the following functions:
call_command_ping(in generalcall_${COMMAND_NAME}), to call the respective command;subscribe_var_nping(in generalsubscribe_${VAR_NAME}) to register a callback each time an update to the variable is published.
${INTERFACE_NAME}Intf is essentially a proxy which routes command calls
and variable subscriptions to the EVerest framework.
Implementation.hpp contains an abstract class called
interface_pingImplBase
(in general, ${INTERFACE_NAME}ImplBase), which is used
when providing the interface.
It contains the following functions:
publish_var_nping(in generalpublish_${VAR_NAME}), to publish an update to the variable;handle_command_ping(in generalhandle_${COMMAND_NAME}), which is virtual - this function is called to handle the respective command.
Interface implementations extend ${INTERFACE_NAME}ImplBase, and must
implement all command handlers (handle_${COMMAND_NAME}).
The EVerest framework takes care of publishing variable updates, listening for commands, calling the appropriate handler, and sending back its return value to the caller.
The Types.hpp file contains custom type definitions.
4.4.2. Module files
Using ev-cli module create for the two modules from above generates
the following new files (we omit the manifest.yaml here):
.
└── modules
    ├── PingServerModule
    │   ├── CMakeLists.txt
    │   ├── PingServerModule.cpp
    │   ├── PingServerModule.hpp
    │   ├── doc.rst
    │   ├── docs
    │   │   └── index.rst
    │   └── if_impl_id_ping
    │       ├── interface_pingImpl.cpp
    │       └── interface_pingImpl.hpp
    │
    └── PingClientModule
        ├── CMakeLists.txt
        ├── PingClientModule.cpp
        ├── PingClientModule.hpp
        ├── doc.rst
        ├── docs
        │   └── index.rst
        └── if_impl_id_empty
            ├── emptyImpl.cpp
            └── emptyImpl.hpp
Focusing on the source and header files, generally, the tool generates:
One source-header pair describing a class for the whole module:
${MODULE_NAME}.{cpp, hpp};One source-header pair describing a class for each interface implementation in the module:
${IMPLEMENTATION_ID}/${INTERFACE_NAME}Impl.{cpp, hpp}
4.4.2.1. The module class
The module class, which carries the same name as the module itself, is defined
in ${MODULE_NAME}.hpp.
Apart from a constructor (called by the EVerest framework on startup), it has a few notable members:
configof typeConf(defined in the same file): Config values for the module;mqtt: handle for MQTT communication, ifenable_external_mqttwas enabled in the manifest;init(): Function called by the framework after initializing this module - you may add code to it to add more initialization steps;ready(): Function called by the framework when the deployment is ready - you may initiate application logic in it;For each interface implementation:
std::unique_ptr<${INTERFACE_ID}ImplBase> p_${IMPLEMENTATION_ID}- reference to the interface implementation;For each interface requirement:
std::unique_ptr<${INTERFACE_ID}Intf> r_${REQUIREMENT_ID}- use this to trigger commands or subscribe to variables on the provider.
The header file contains designated areas where further members or other definitions can be added.
Code added to these areas will be preserved if the headers are
overwritten by the ev-cli module update command (e.g. if you updated
the module manifest).
${MODULE_NAME}.cpp initially only contains stub implementations of the
init() and ready() functions, which just call the init() and
ready() functions in each interface implementation:
void PingServerModule::init() {
    invoke_init(*p_if_impl_id_ping);
}

void PingServerModule::ready() {
    invoke_ready(*p_if_impl_id_ping);
}
Further logic can be freely added to this file - ${MODULE_NAME}.cpp is
not overwritten by ev-cli module update, unless the --force option
is specified.
Definitions related to the module class are placed in the module namespace.
4.4.2.2. Interface implementations
For each interface implementation, a class is defined in
${IMPLEMENTATION_ID}/${INTERFACE_NAME}Impl.hpp.
This class extends ${INTERFACE_NAME}ImplBase, declaring overriding methods
for all command handlers, as well as a few additional notable members:
configof typeConf(defined in the same file): Config values (TODO: Is this unused?);mod: reference to the module instance (e.g. to call methods of the module class);init()andready(), which have the same semantics as the module class’sinit()andready().
Like the module class, interface implementation classes are also constructed by the framework at startup.
${IMPLEMENTATION_ID}/${INTERFACE_NAME}Impl.cpp initially contains stub
implementations of the
init() and ready() functions - recall from the previous subsection
that these are called by the module class’s init() and ready()
functions, therefore they are called at (roughly) the same point.
It also contains stubs for the command handlers, which return dummy values -
this way, the code generated by ev-cli can be built and ran
even if you have not yet written any code.
As was the case for the module class’s files, you may freely extend the
${IMPLEMENTATION_ID}/${INTERFACE_NAME}Impl.cpp file as it will not be
overwritten by subsequent ev-cli module update commands - however,
${IMPLEMENTATION_ID}/${INTERFACE_NAME}Impl.hpp does get overwritten, so
you should only add your changes to the designated areas in that file.
Definitions related to the interface implementation are in the
module.${IMPLEMENTATION_ID} namespace.
4.4.2.3. Note on concurrency
Parts of the module logic may run in parallel. By itself, the EVerest framework starts:
One thread to execute the
ready()function of the module class, which you can freely use to start logic of your own (e.g. an endless loop, or spawning worker threads);A thread pool to handle commands (these will call the command handlers in interface implementations);
A thread pool to watch for variable updates the module has subscribed to (these will call the callbacks you provide to
subscribe_${VAR_NAME})
In general, assume functions called by the framework may be running in parallel. If data structures need to be shared between such functions (especially for writing), you should probably use some form of locking.