8. Pionix BelayBox
8.1. Introduction
The BelayBox is a reference platform specifically designed for development and testing of the open source software EVerest.
Inside the box, a Raspberry Pi is built in and we are officially part of the “Powered by Raspberry Pi” scheme:

BelayBox can be utilized by individuals, research facilities and companies alike to
parallelize HW and SW developments for new charger projects,
explore new charging algorithms without the need do all the groundwork,
rapid integration of EV charging with other applications
and anything else you want to quickly do without building your own EVerest compatible charger first.
The BelayBox is not meant to be used for private usage or outdoor charging.
8.1.1. The BelayBox hardware
Inside, the BelayBox consists mainly of the Yeti board - an AC charger for electric vehicles (EV) supporting IEC-61851-1 and SAE J1772 - and the Yak board, which is a high-level control board for EV charging stations supporting ISO 15118-2 (with ISO 15118-20 on its way) and DIN SPEC70121.
As both Yeti and Yak Board are also released as Open Hardware under CERN Open Hardware Licence Version 2 (Permissive), we are very happy to point you to the schematics and design files and also the firmware:
The 3D files of the BelayBox case components can be downloaded here: BelayBox 3D files.
For more information about vendors working with EVerest, contact us via the EVerest mailing list.
8.2. Setting up Hardware and Software
8.2.1. Assembling the Yak Board
Starting assembling the Yak Board, you should have the following parts available:
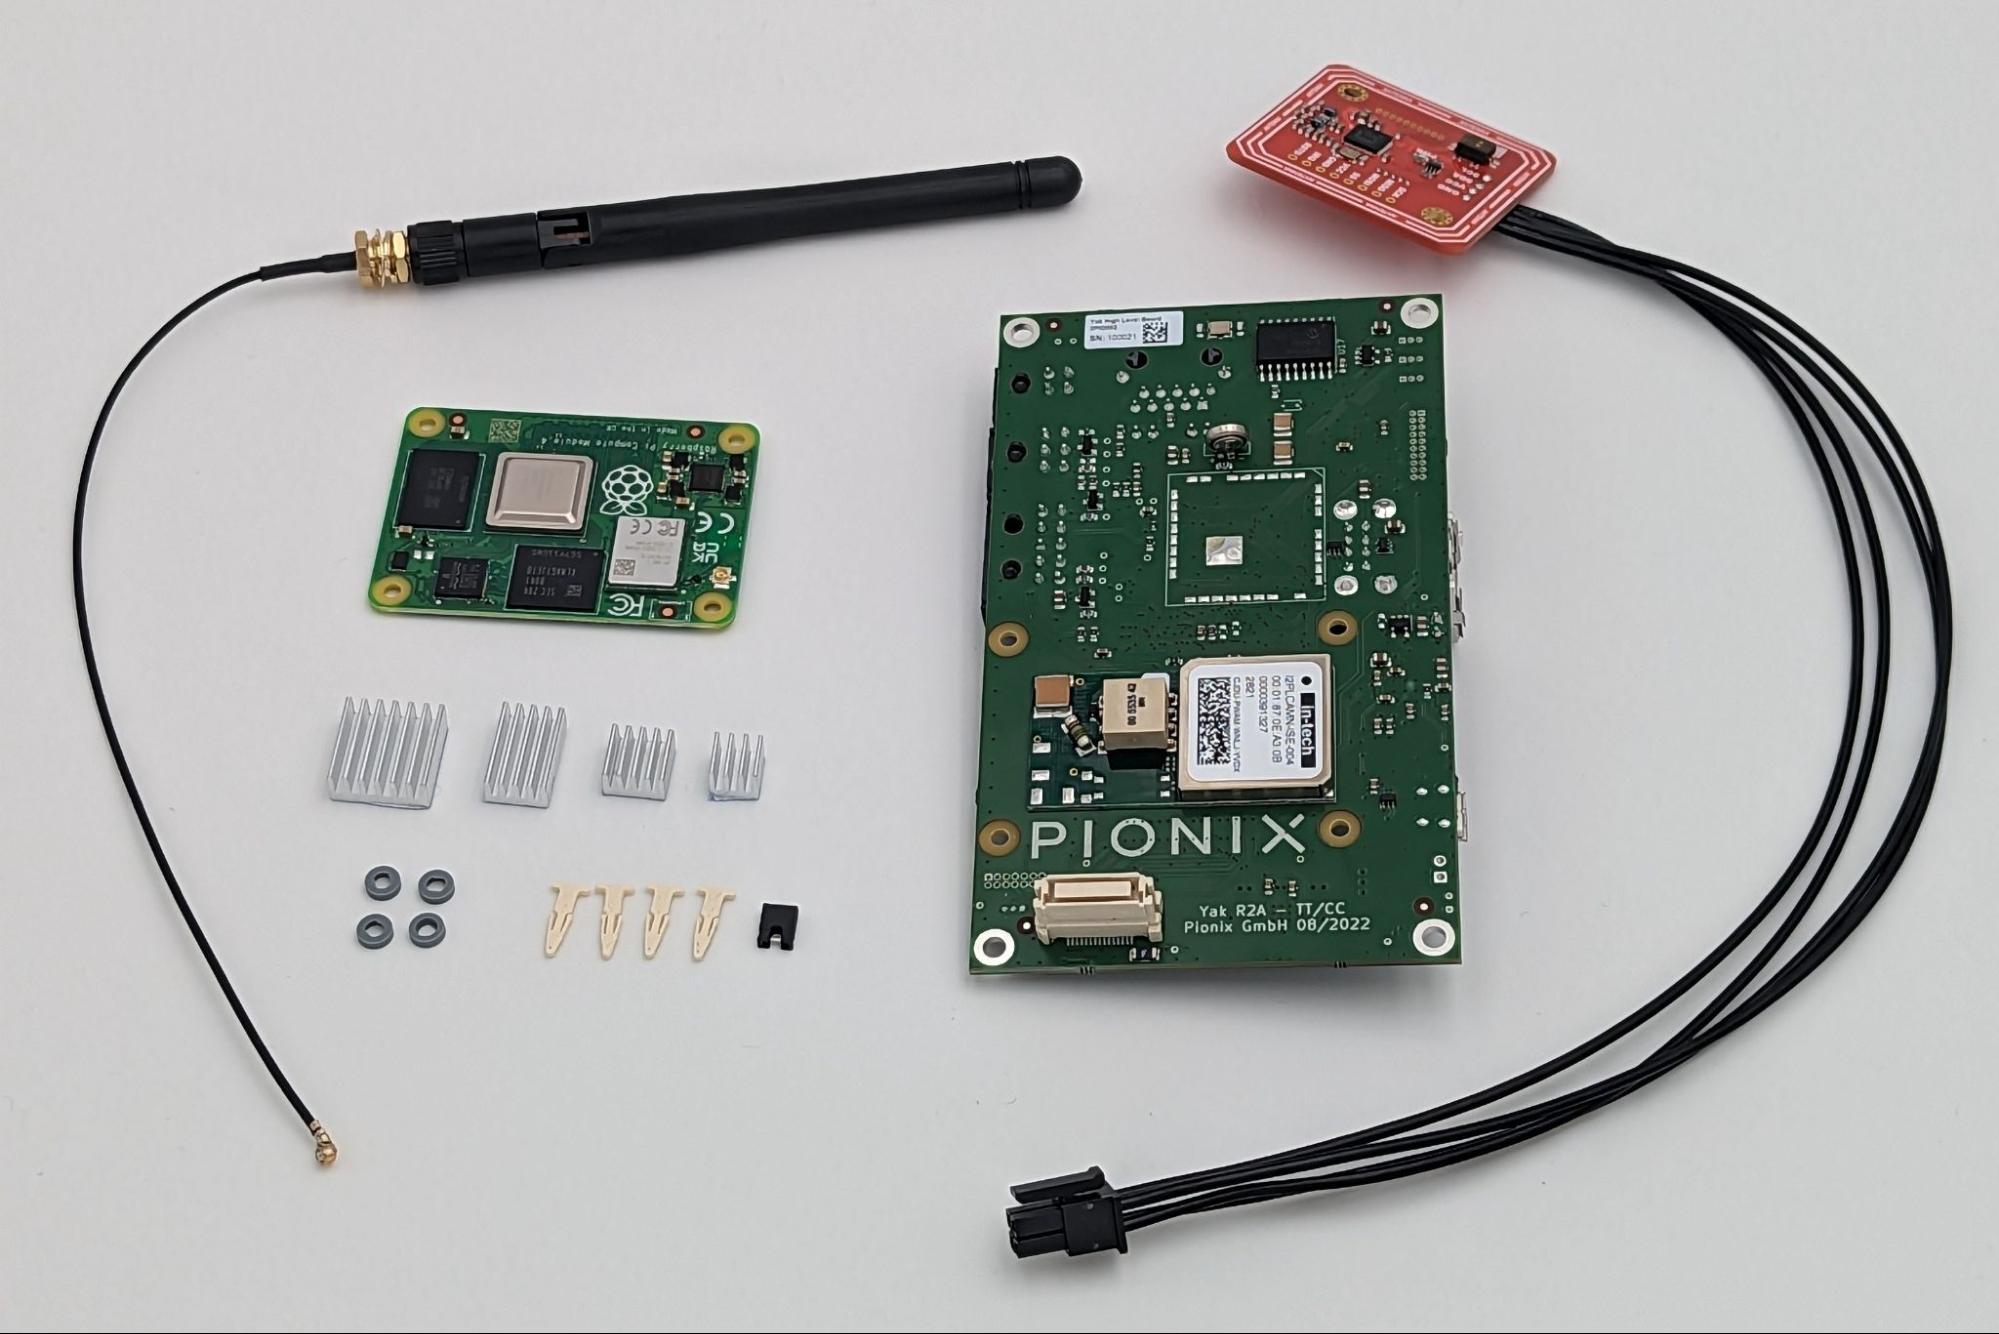
And you will need the following tools:
ESD safe environment, e.g. ESD wrist band
ESD underlay mat
Linux host system, Ubuntu >18 recommended
1x Micro USB cable
12V DC power supply with minimum 30W to connect to “12V IN” pins on Yak board. A lab power supply is sufficient.
Needed software:
balenaEtcher (“dd” also works but is dangerous to use and much slower)
Internet access from host system
Warning
Before working with any open PCB make sure to work in an ESD safe environment using ESD safe equipment only.
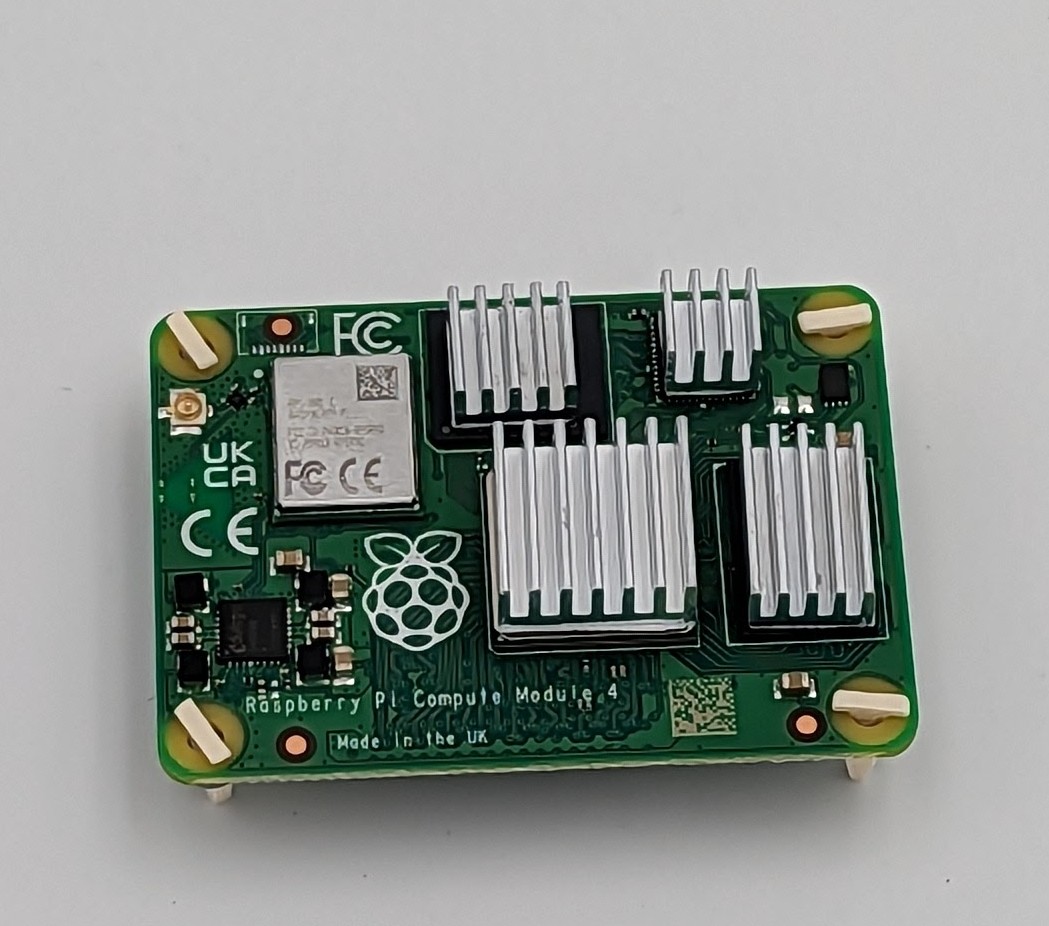
Glue on the heatsinks as shown in the following image using the double sided tape that comes with the heatsinks. Plug in the small clips into the mounting holes of the CM4 board as shown.
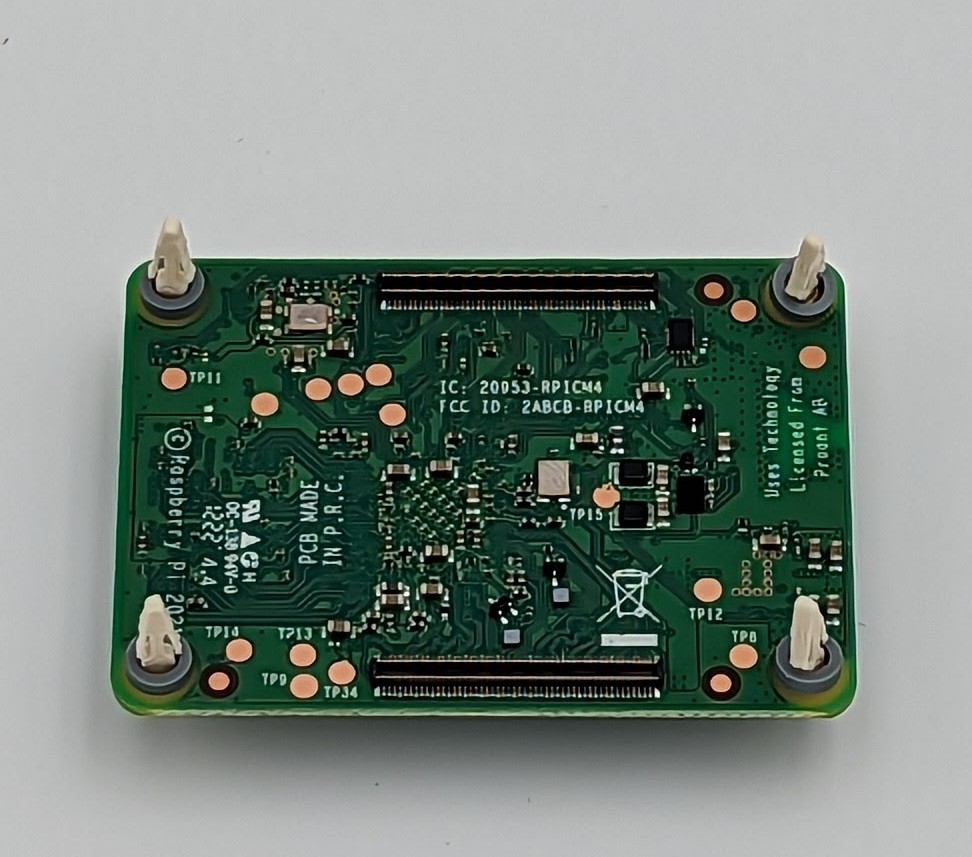
Turn around the CM4 and put on the gray spacers as shown here:
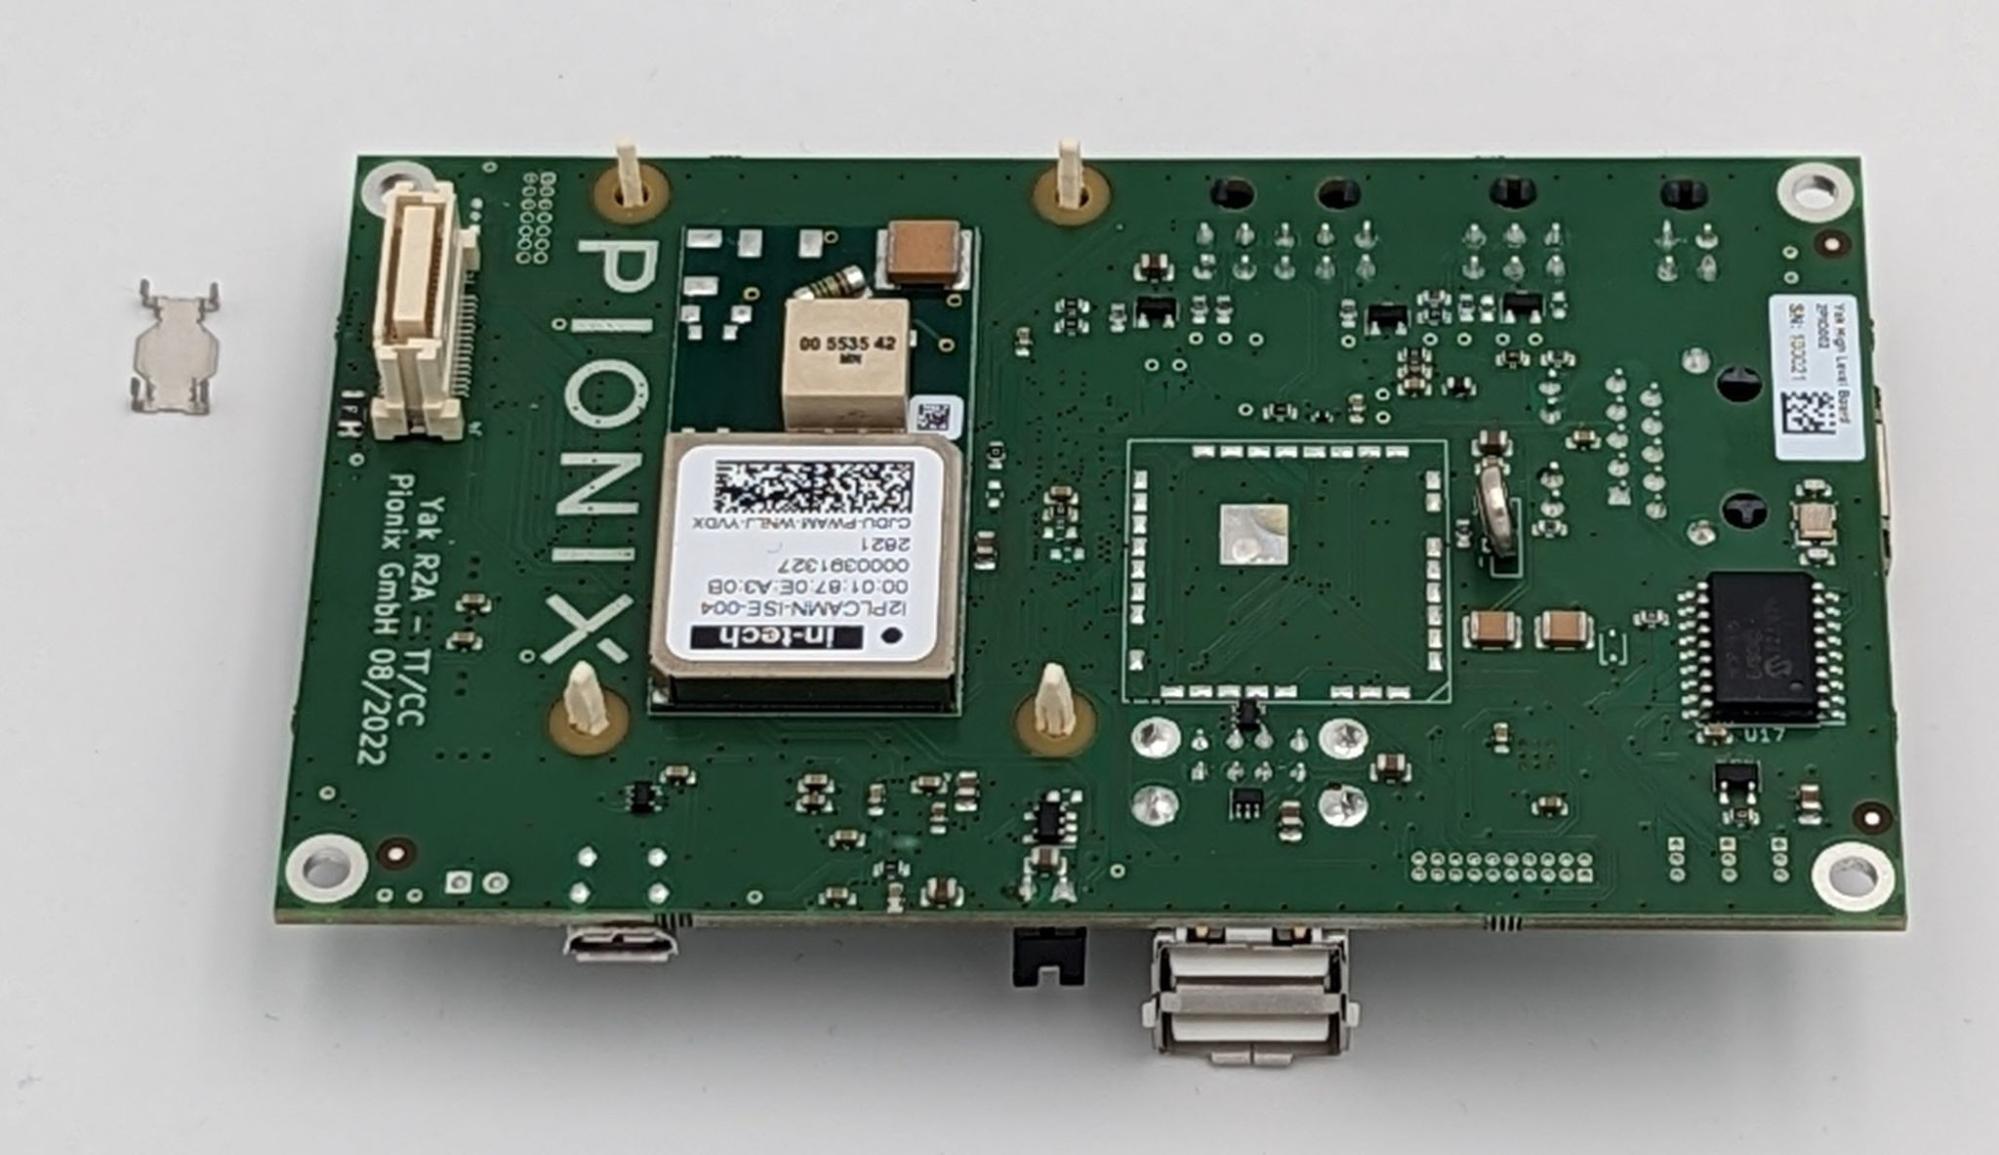
Plug the CM4 board in both connectors and make sure the clips go all the way through the Yak board and hold the CM4 securely without any gaps between the spacers and both boards. Make sure to remove the metal part (if there is one) out of the board-to-board connector as shown in the upper left corner in the following image:
This is how it looks from the top side:
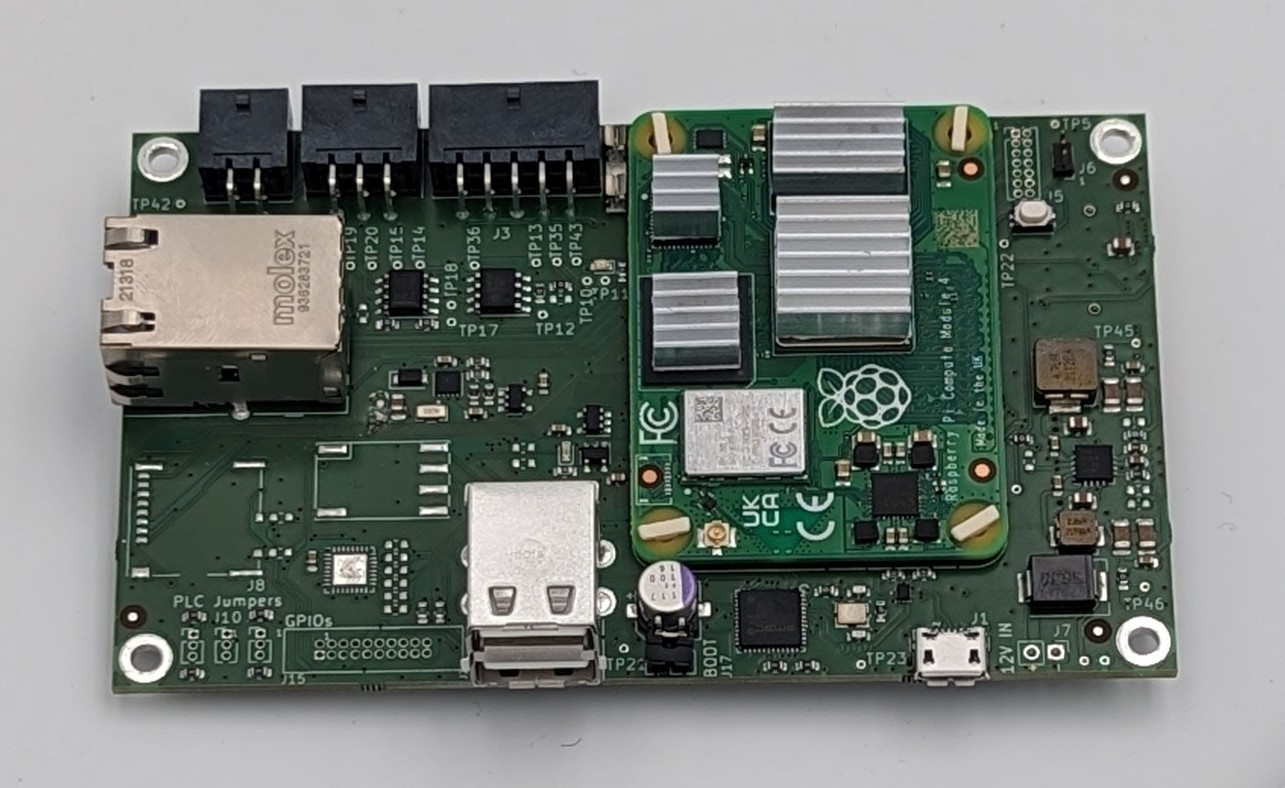
Now place the small black jumper onto the “BOOT” pins as shown above. This is needed to be able to mount the emmC flash to the host system.
8.2.2. Flashing the Yak Board
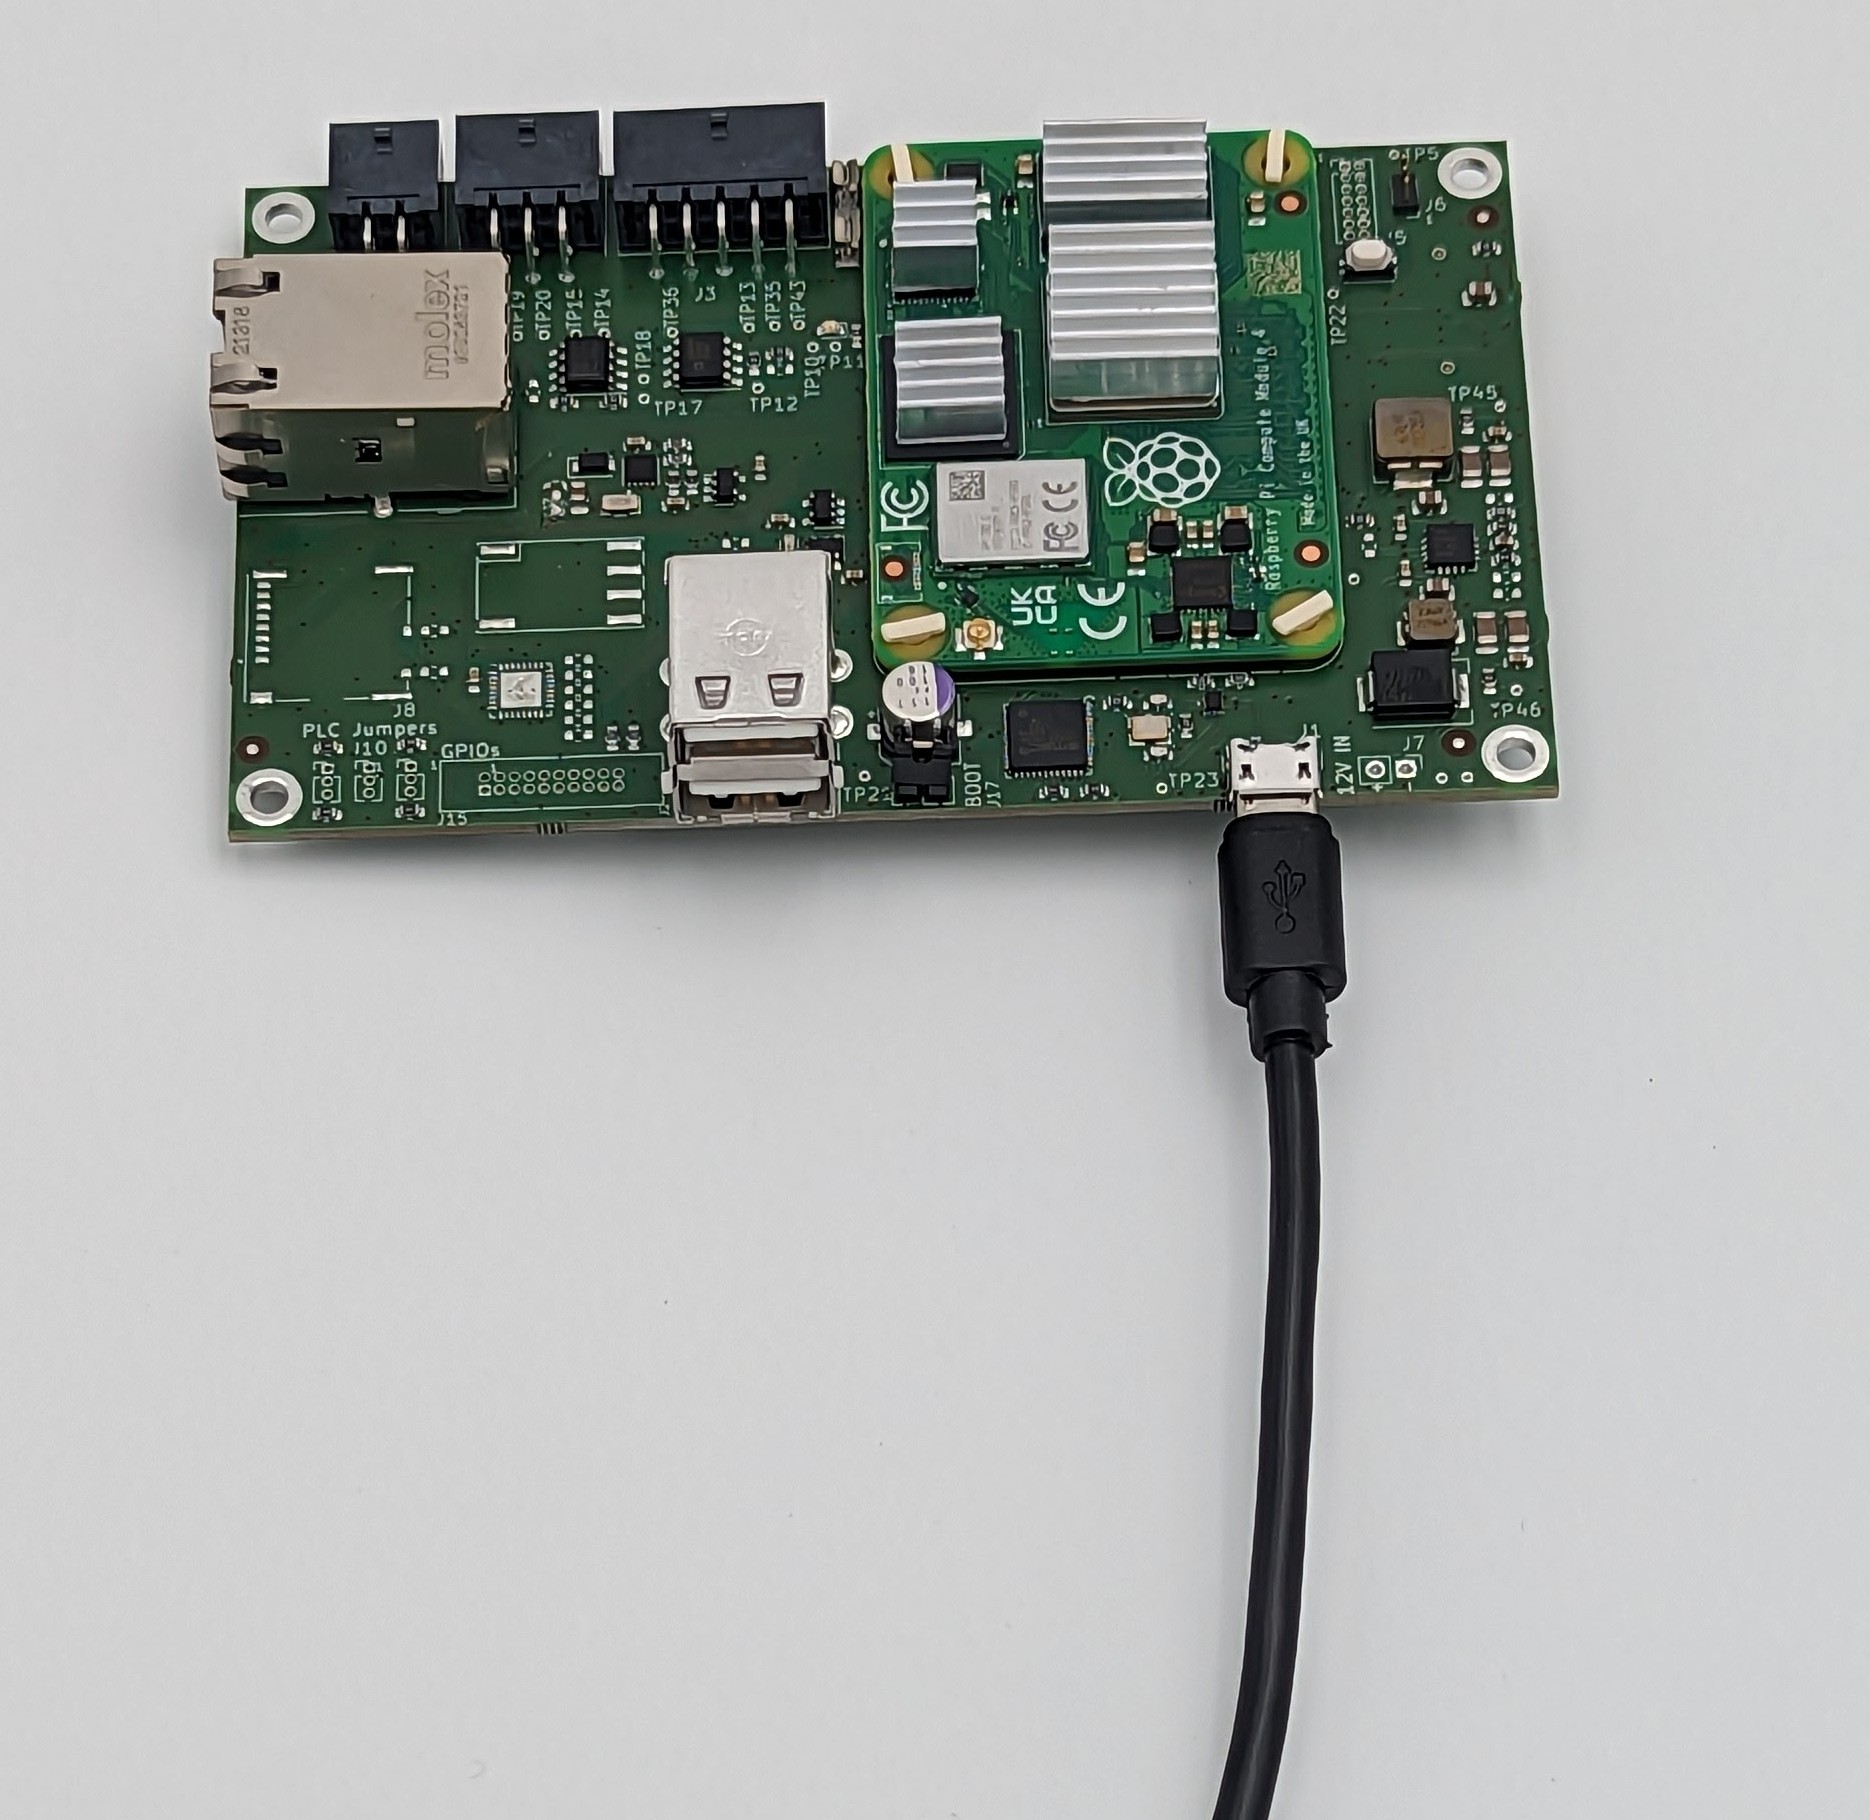
Plug in a micro usb cable to the “J1” USB socket and plug the other end in the linux host system.
Download the image to be flashed to the host system from here: https://pionix-update.de/belayboxr1/stable/current.img.gz e.g. with the command:
wget https://pionix-update.de/belayboxr1/stable/current.img.gz
In order to flash the emmC, please install “rpiboot” as described in here:
https://github.com/raspberrypi/usbboot/blob/master/Readme.md#building
After successful install, execute
sudo ./rpiboot
Power on the Yak board using the 12V power source on the “12V IN” pins. The red LED should light up.
Once rpiboot has detected the board, a green LED should light up on the board.
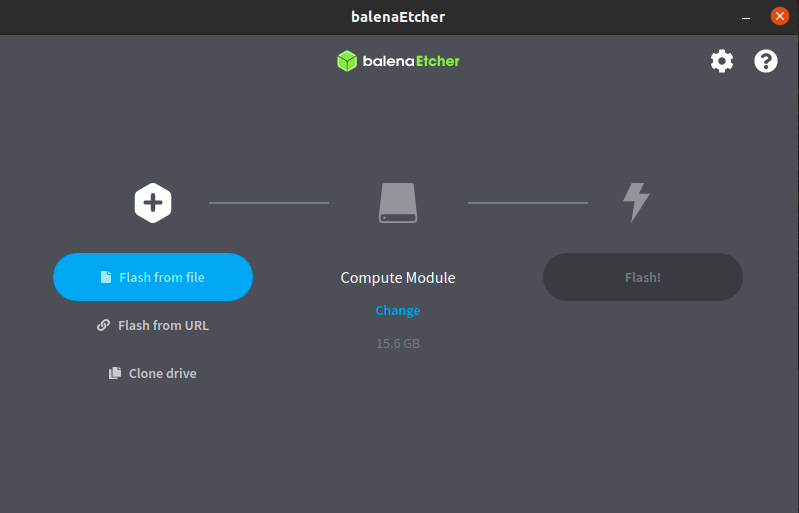
Start the tool balenaEtcher. You should see that balenaEtcher has automatically detected the Compute Module. If not, select the correct drive. Click “Flash from file” and select the extracted file “current.img.gz”. balenaEtcher will automatically unzip the file.
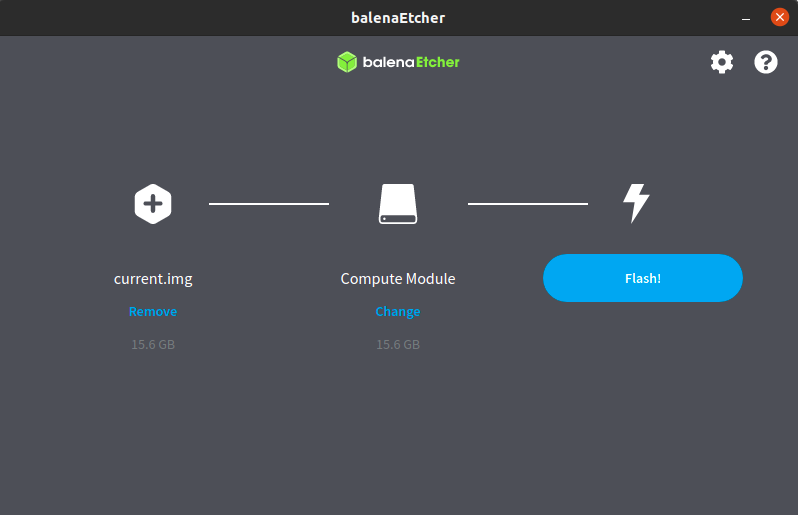
Click “Flash” and wait for the flashing and validation to finish. This can take up to 1.5h. Take a walk and/or treat yourself to a coffee.
The emmC is unfortunately a slow device to flash.
After balenaEtcher reports a successful flash, power down the Yak board and remove the jumper from the “BOOT” pins and the USB cable from the board.
Caution
Make sure to connect the WiFi antenna to the CM4 after flashing. The image activates the external antenna support. Running a flashed Yak without the WiFi antenna mounted will result in damage of the WiFi chip.
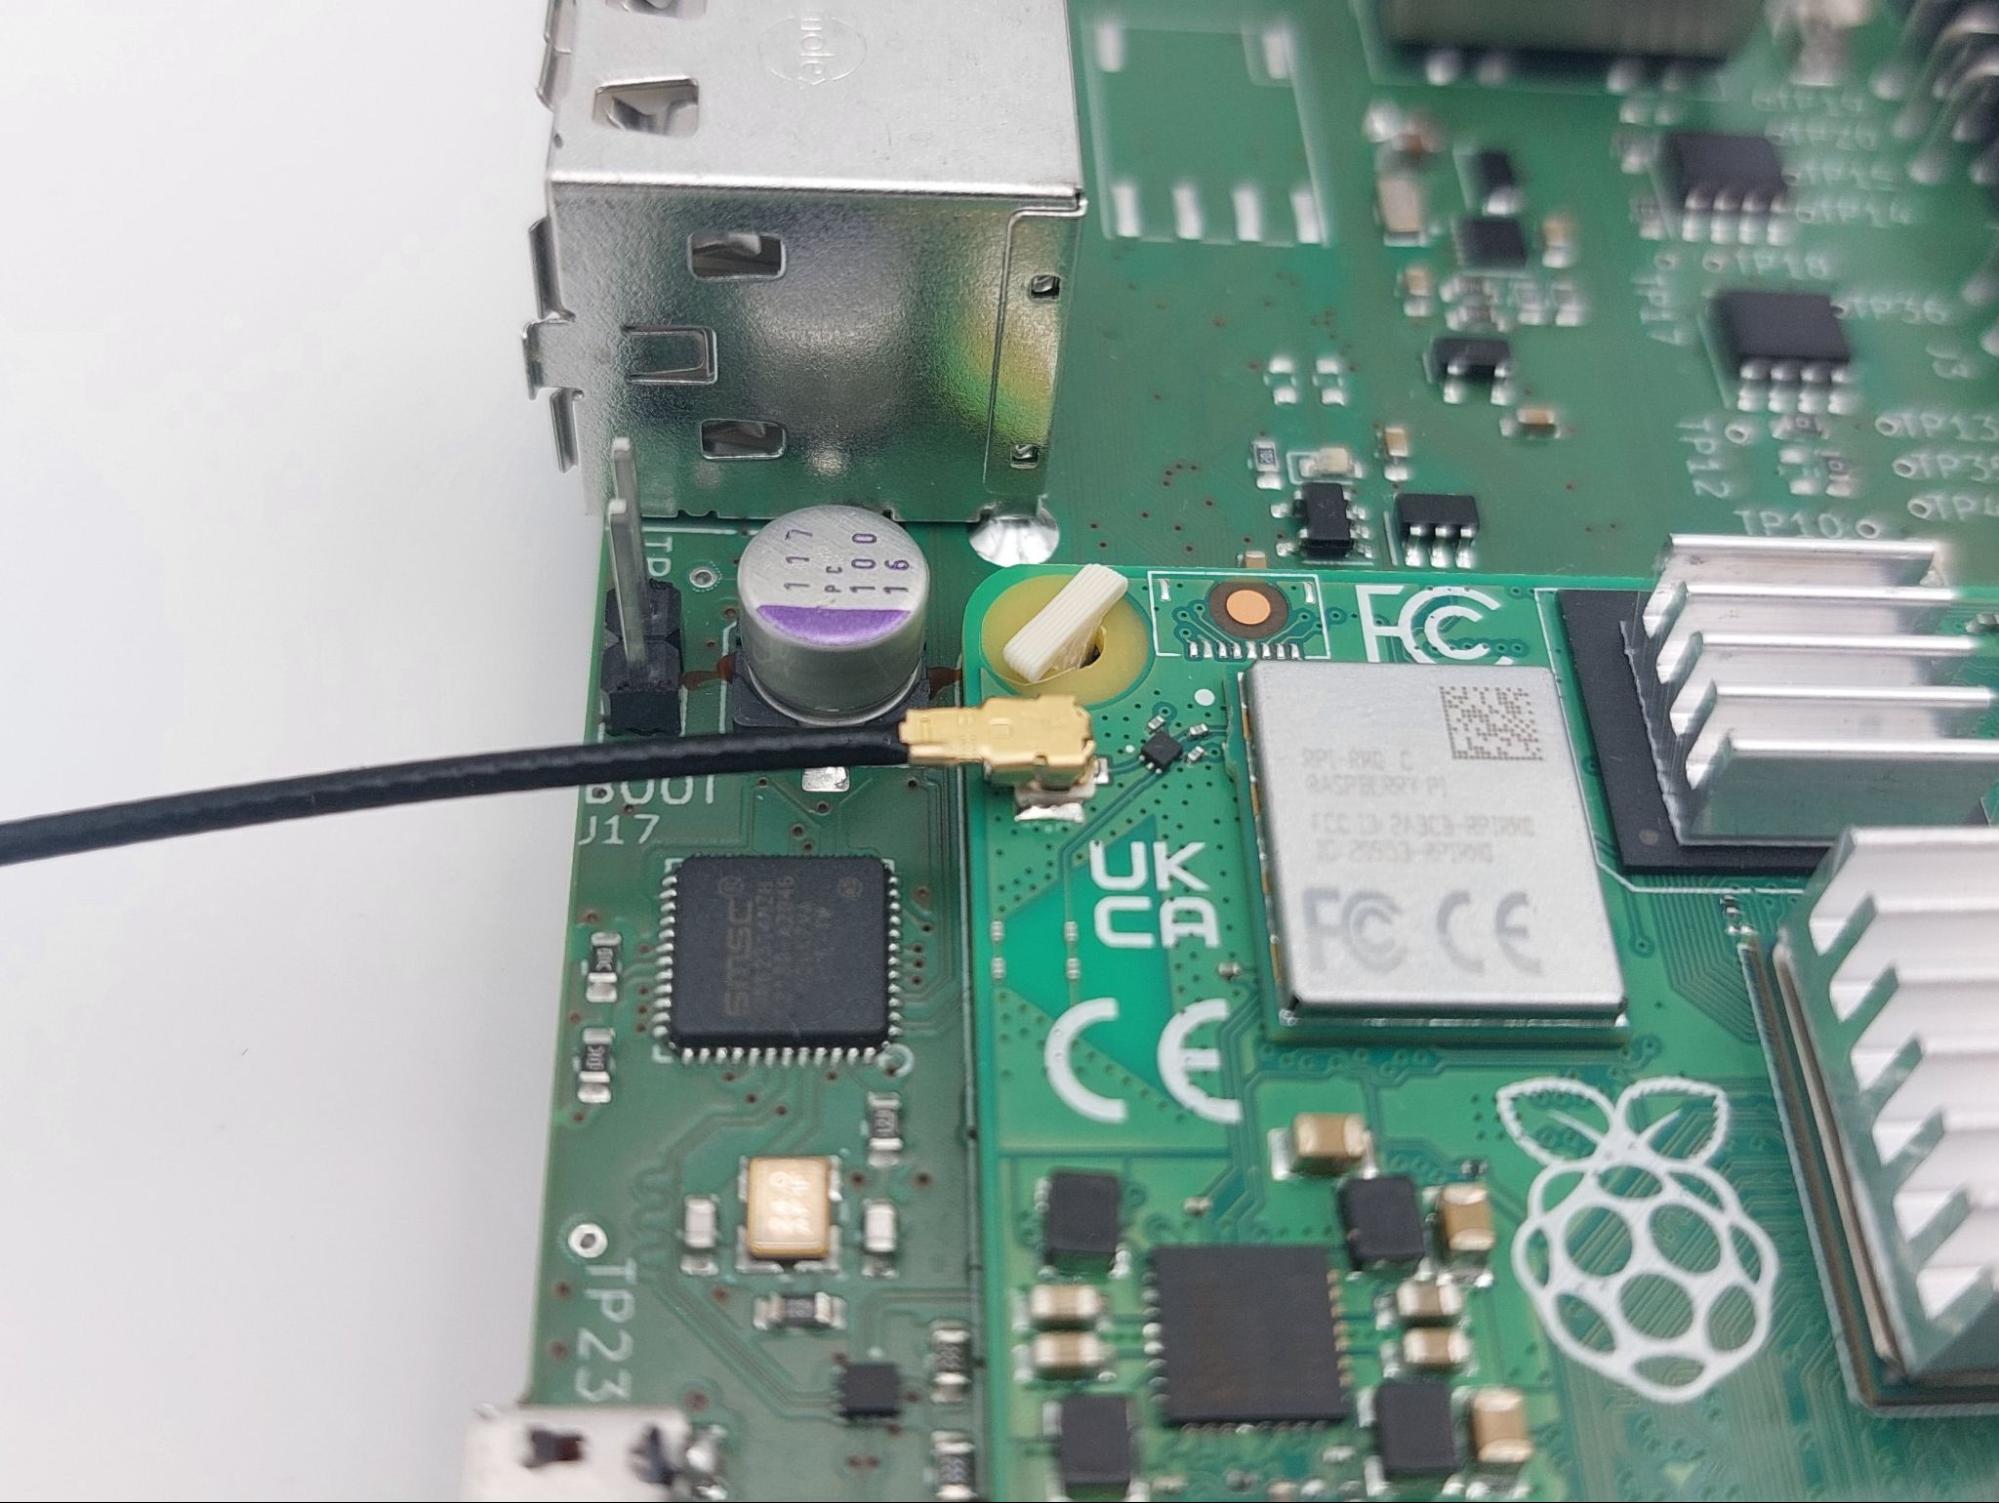
The Yak board is now ready to boot.
8.2.3. Assembling the Yeti Board
Here’s what you should have:
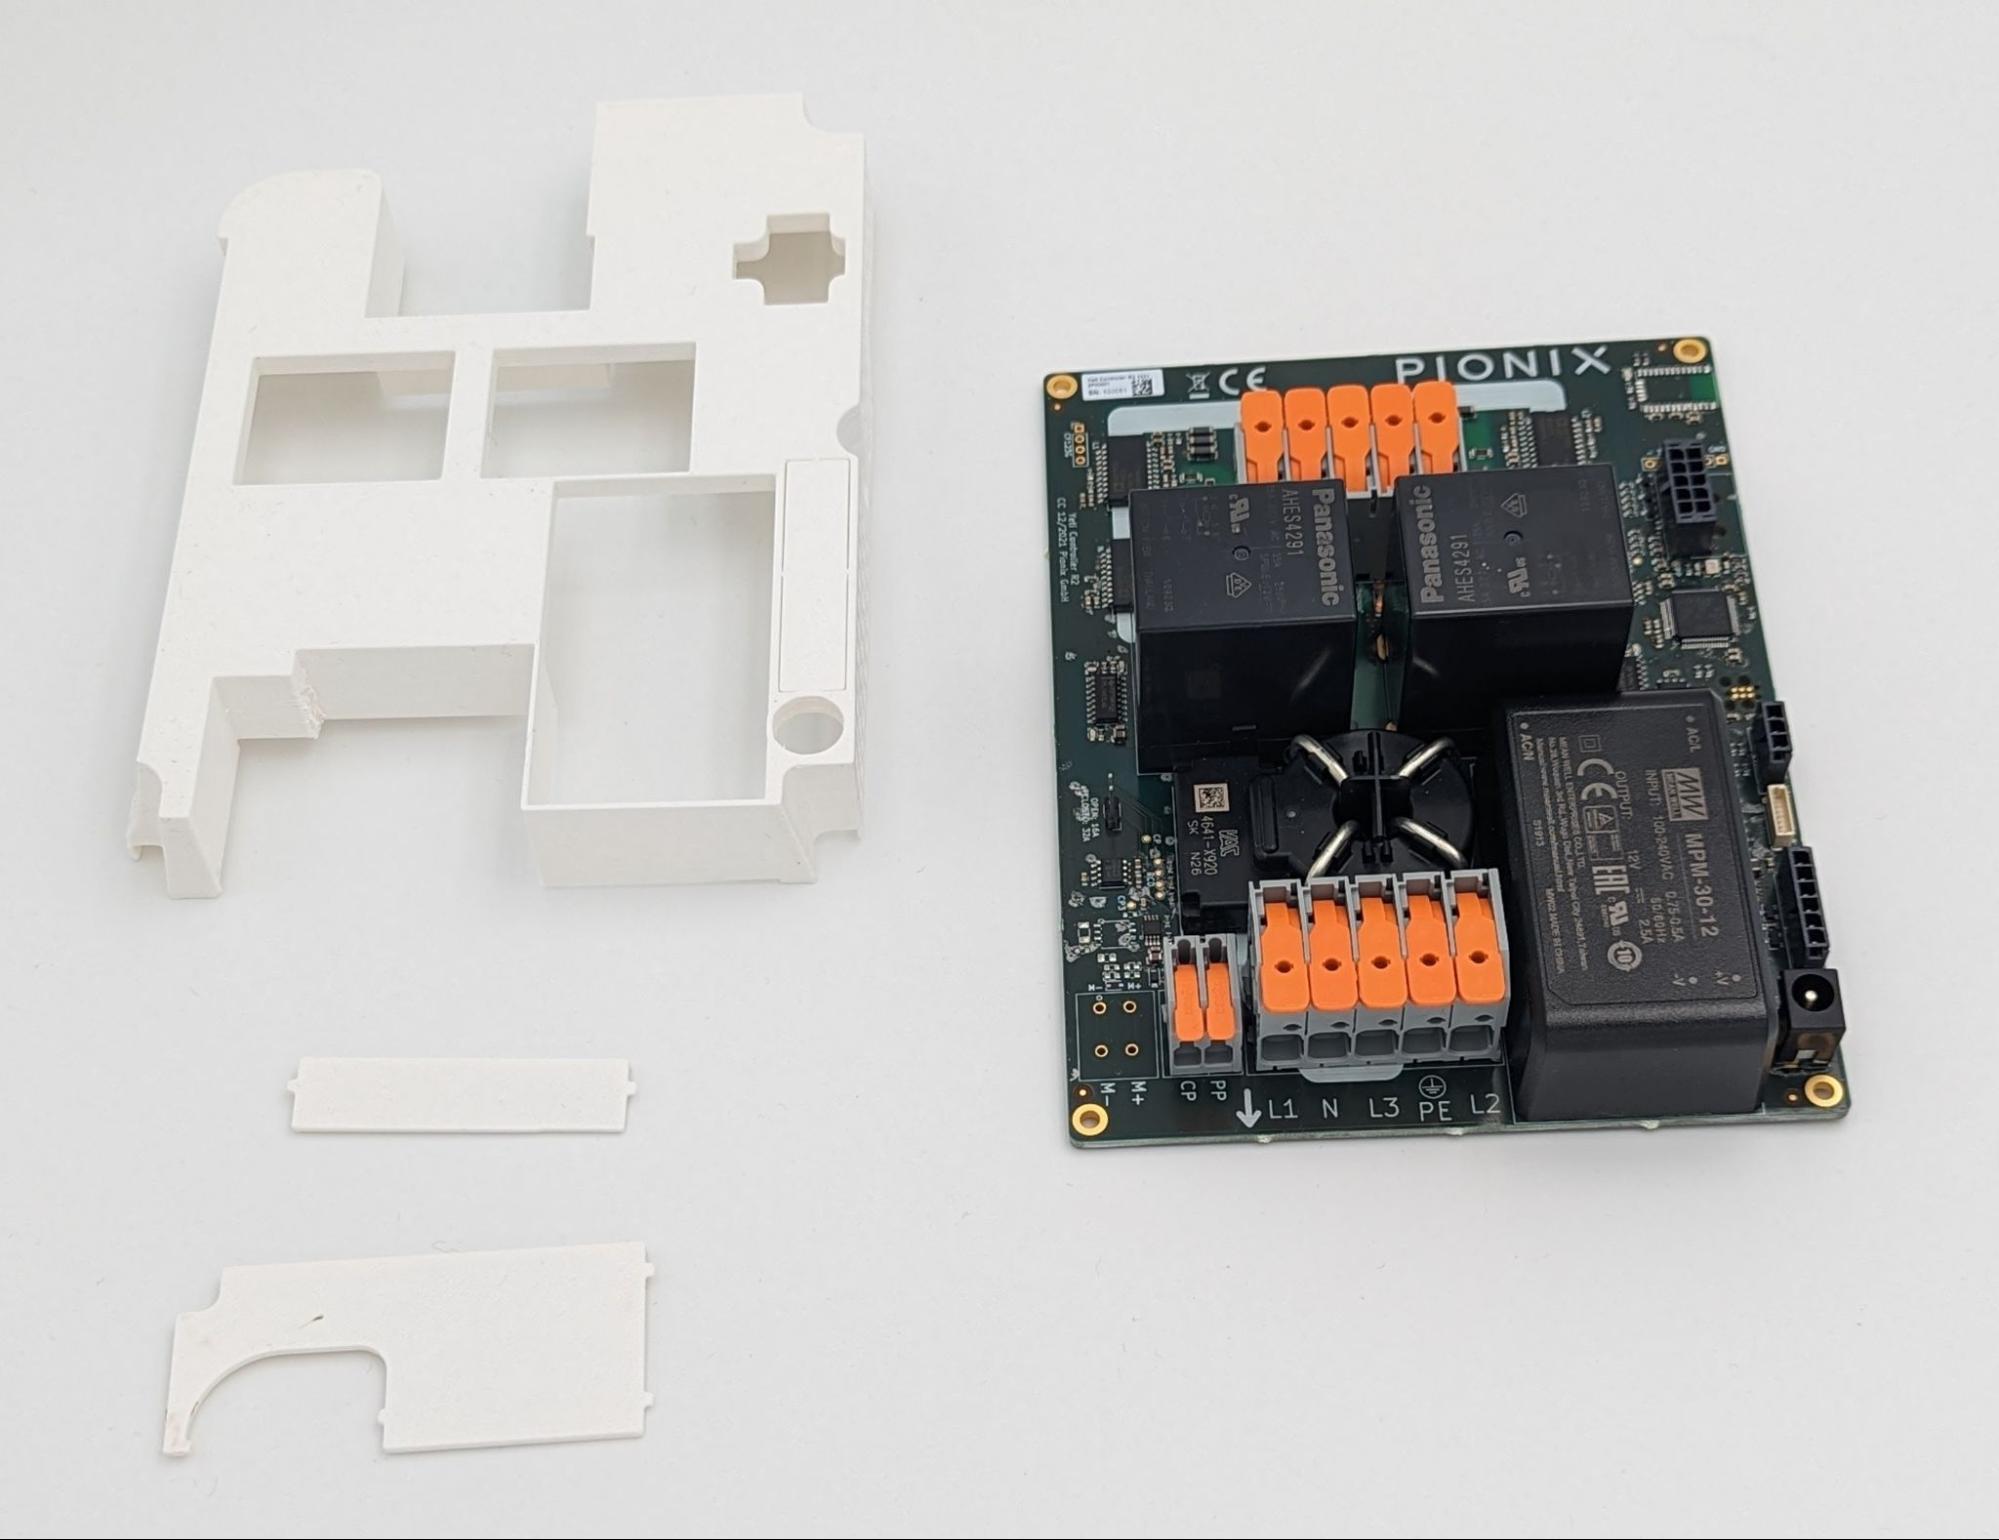
Tools needed:
ESD safe environment, e.g. ESD wrist band
ESD underlay mat
Clip on the touch protection cage and make sure all clips are correctly seated as shown here:
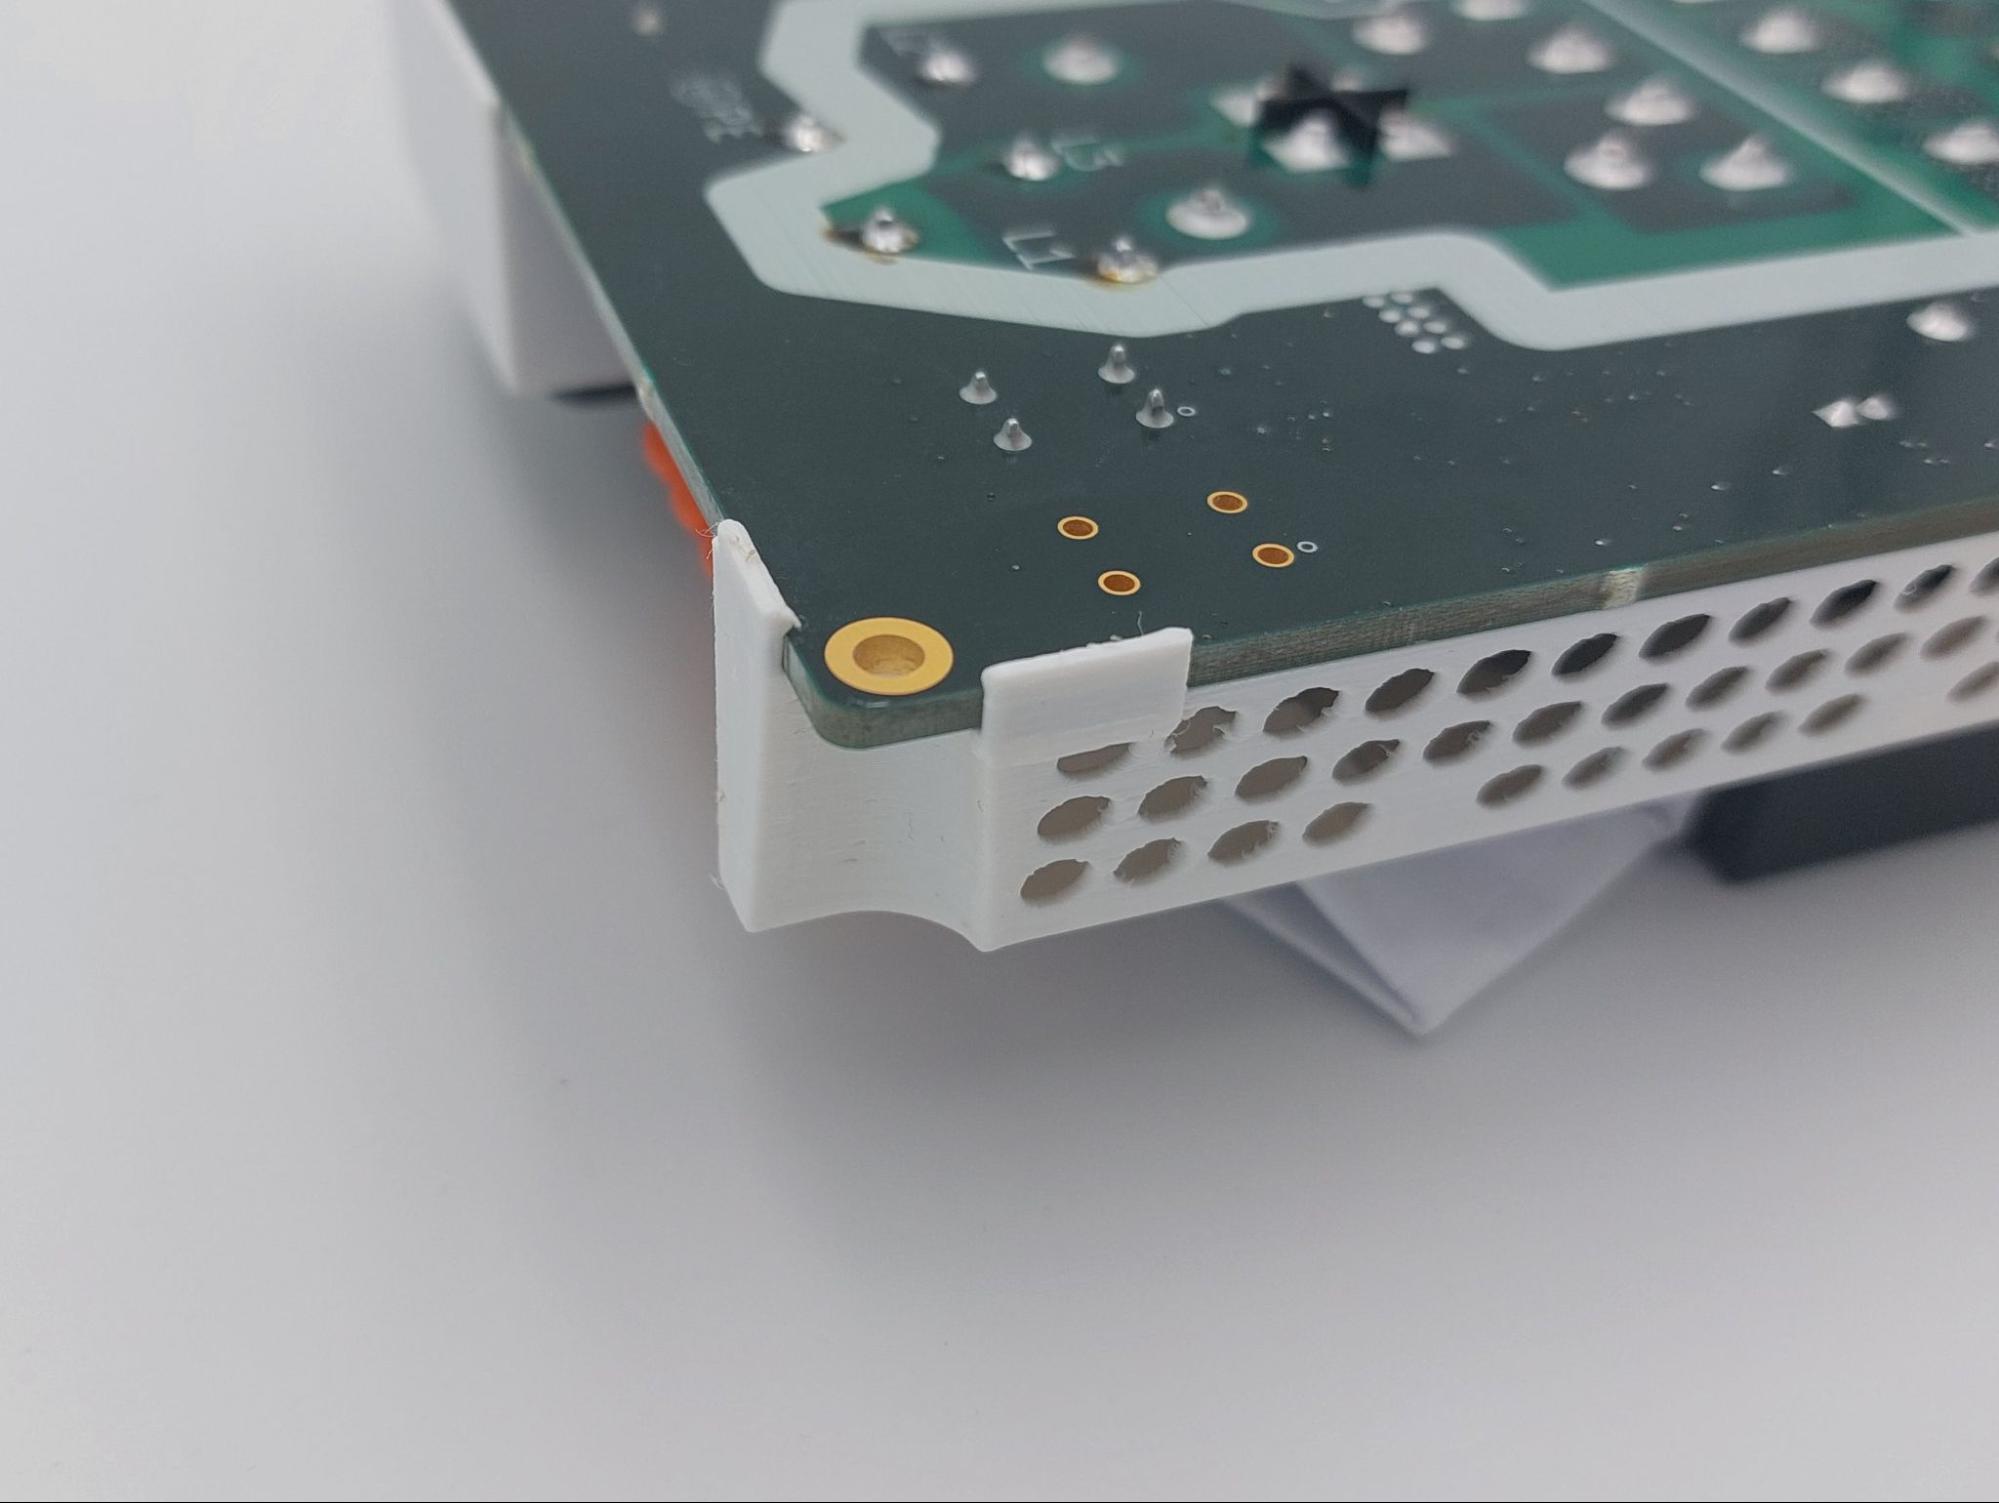
Clip in the smaller part of the touch protection and make sure all clips are correctly seated as shown here:
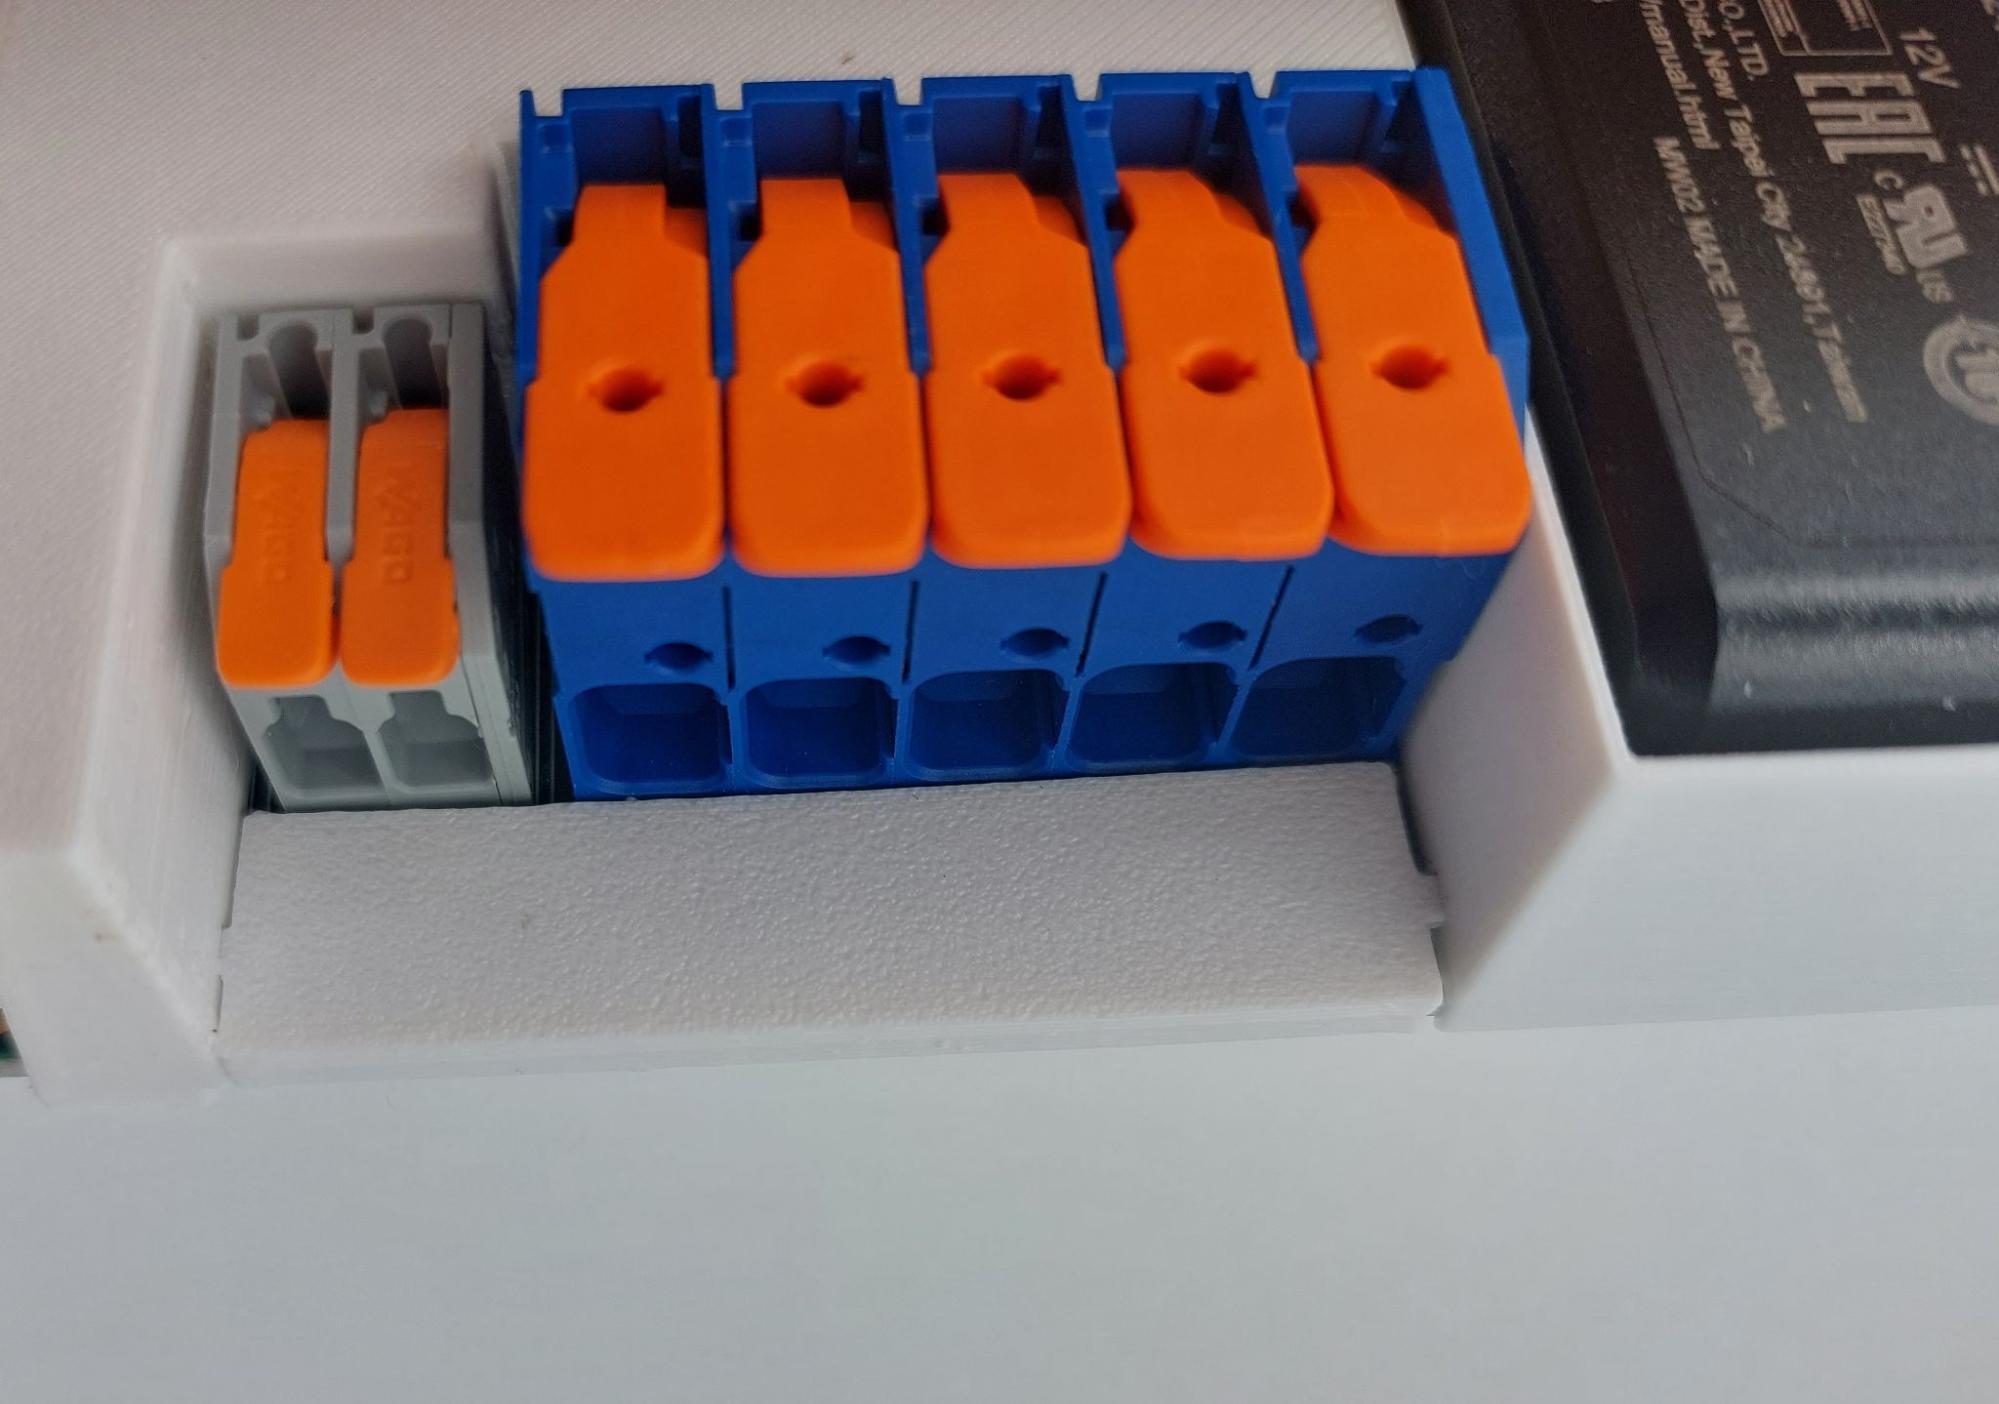
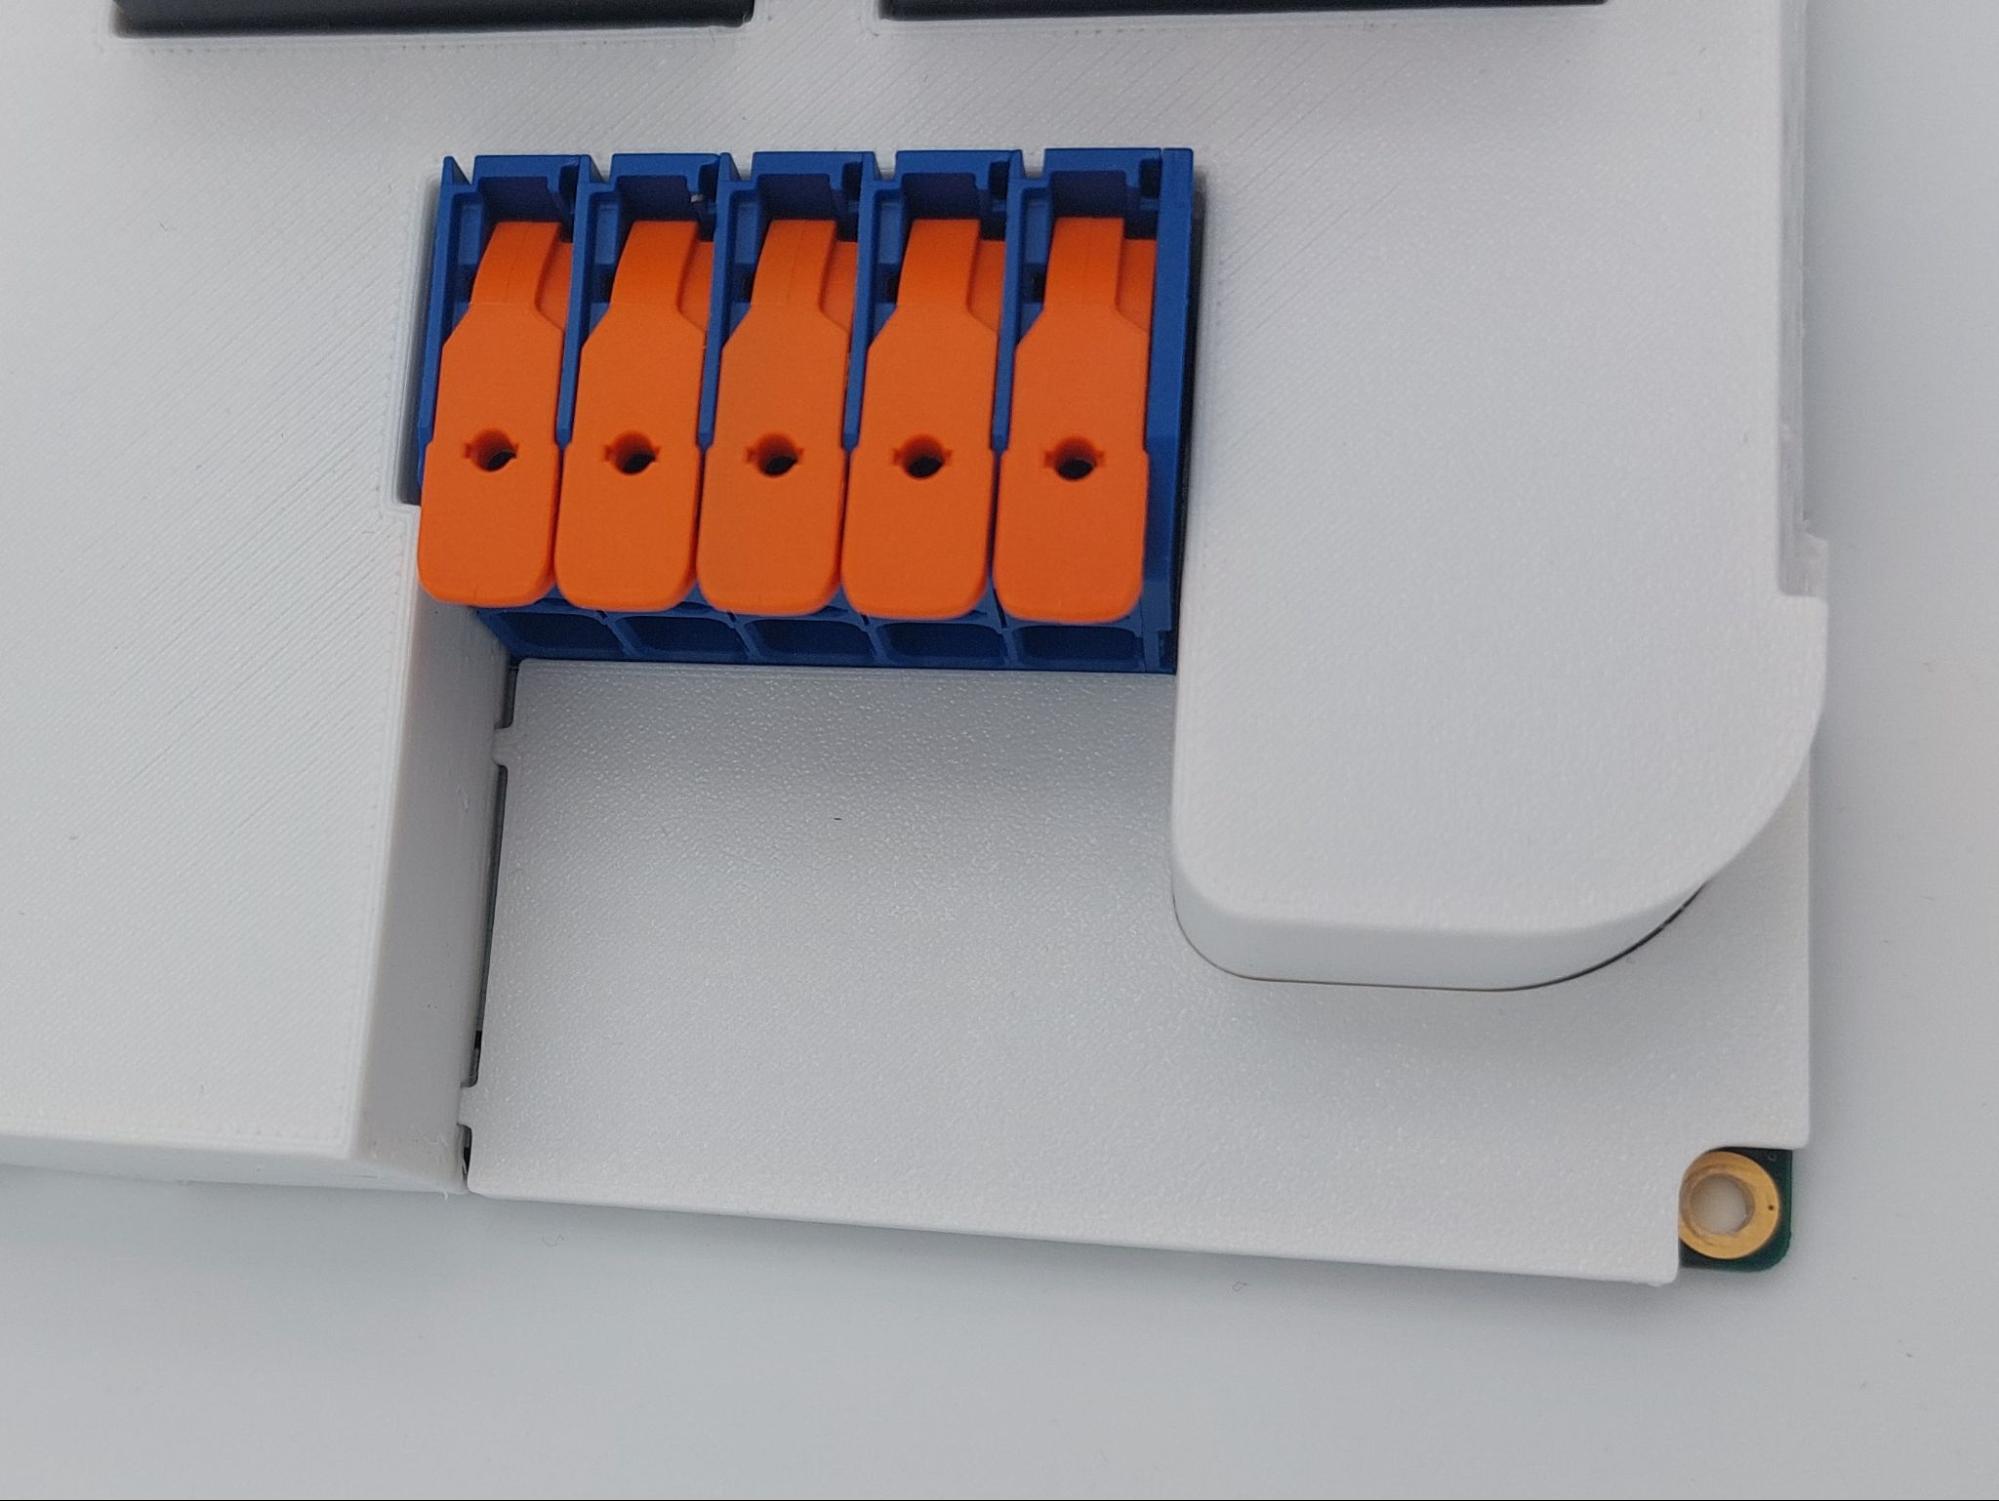
Clip in the bigger part of the touch protection and make sure all clips are correctly seated as shown in the following image:
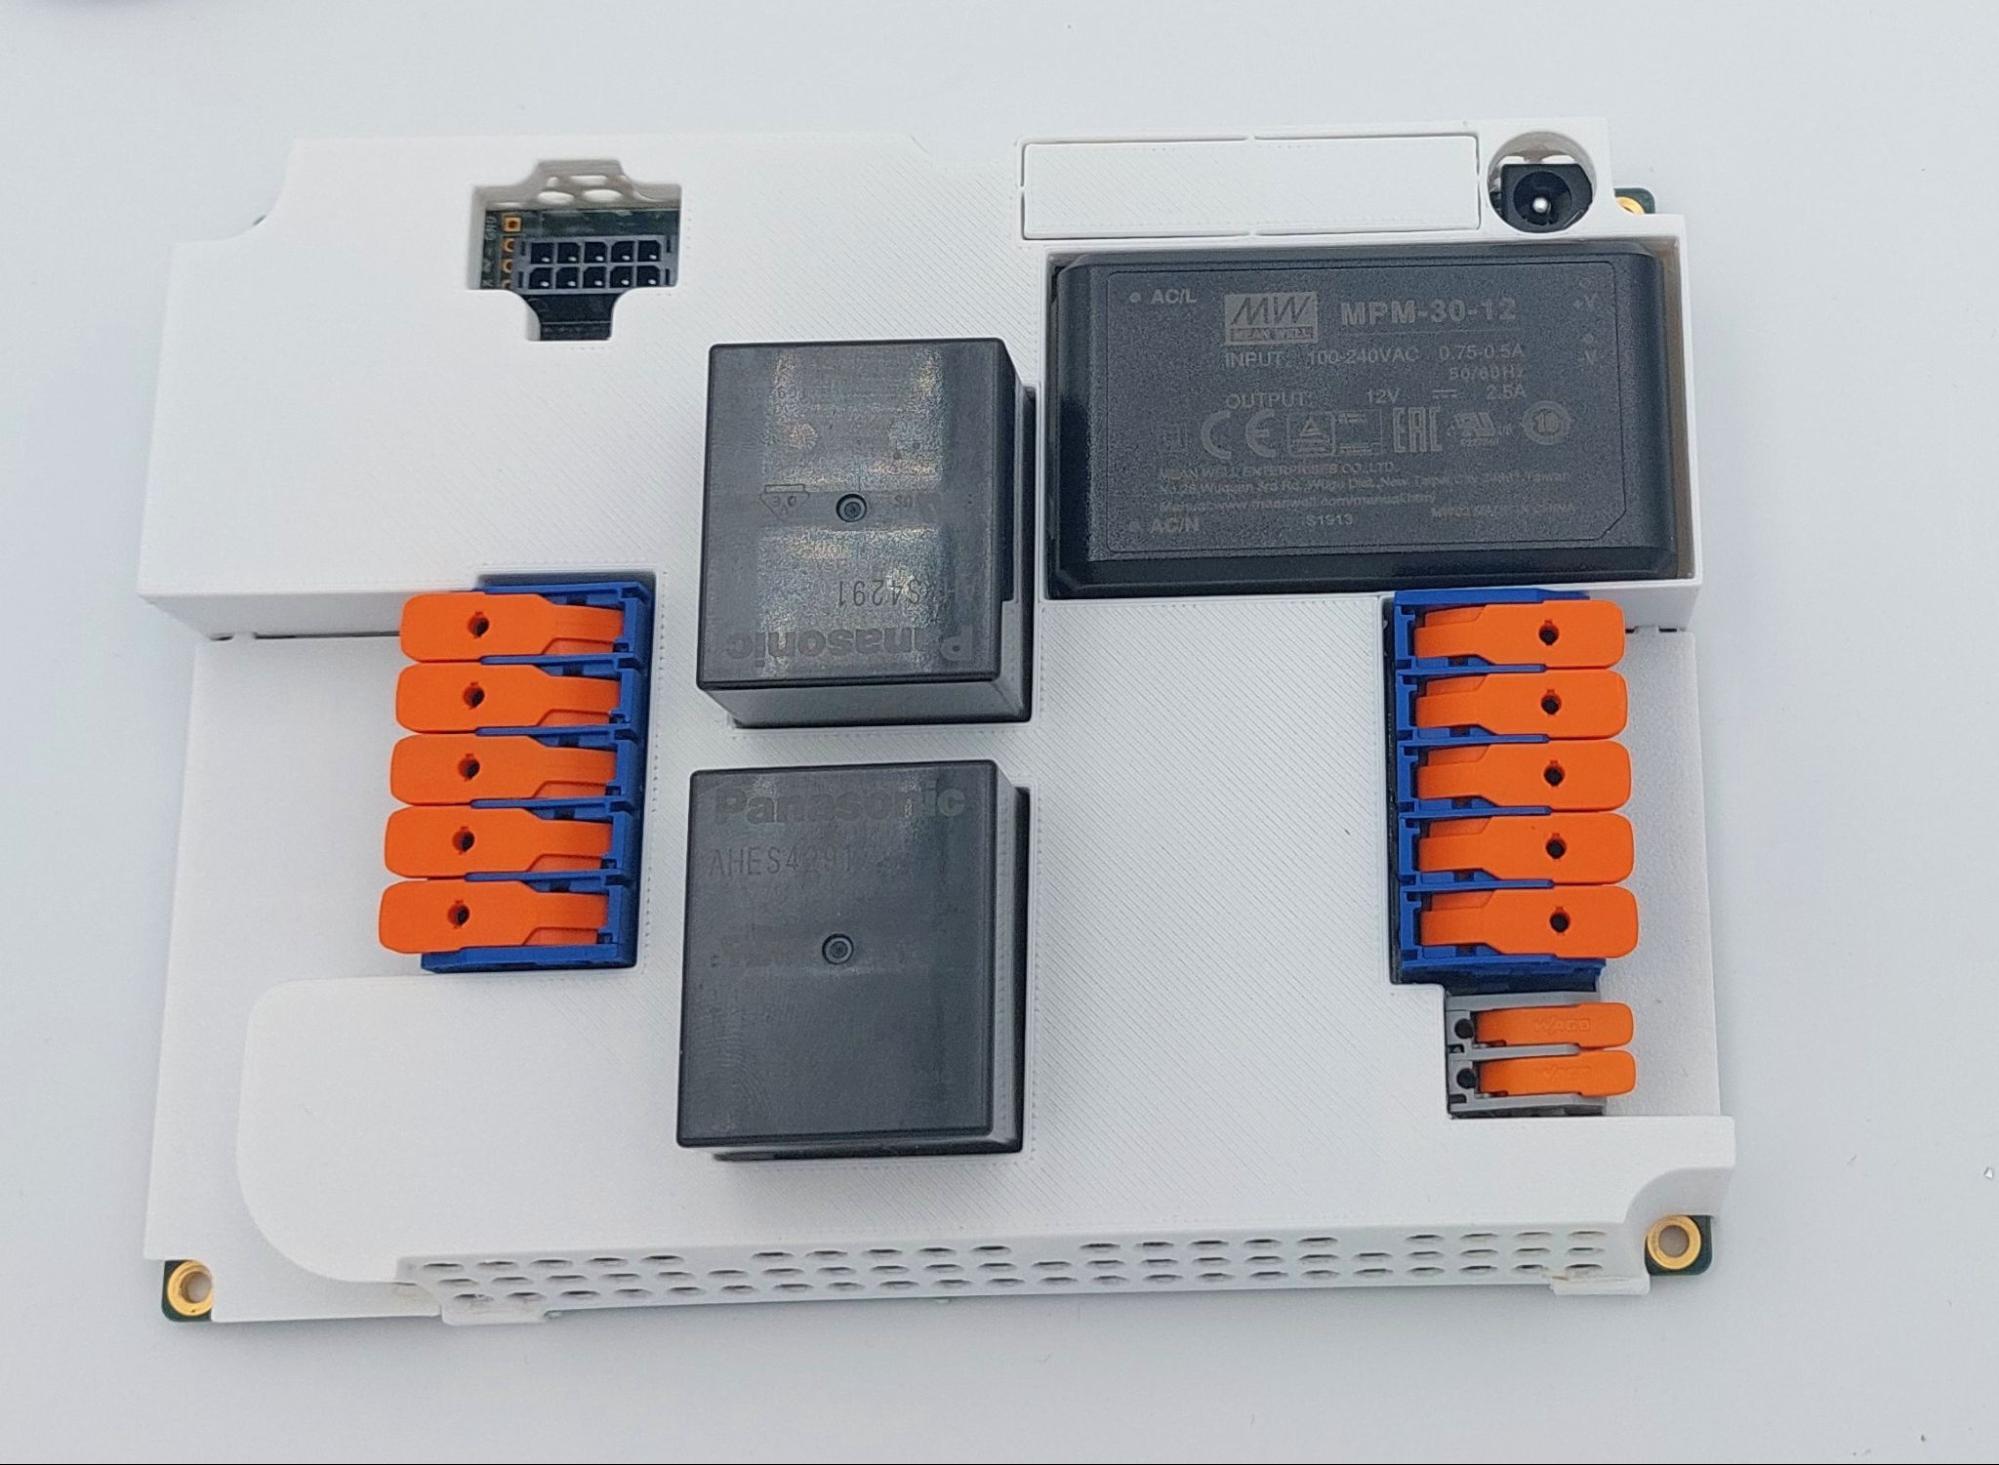
Your mission can be seen as accomplished if your Yeti looks like that:
8.2.4. Preparing the cable set
That’s how we start:
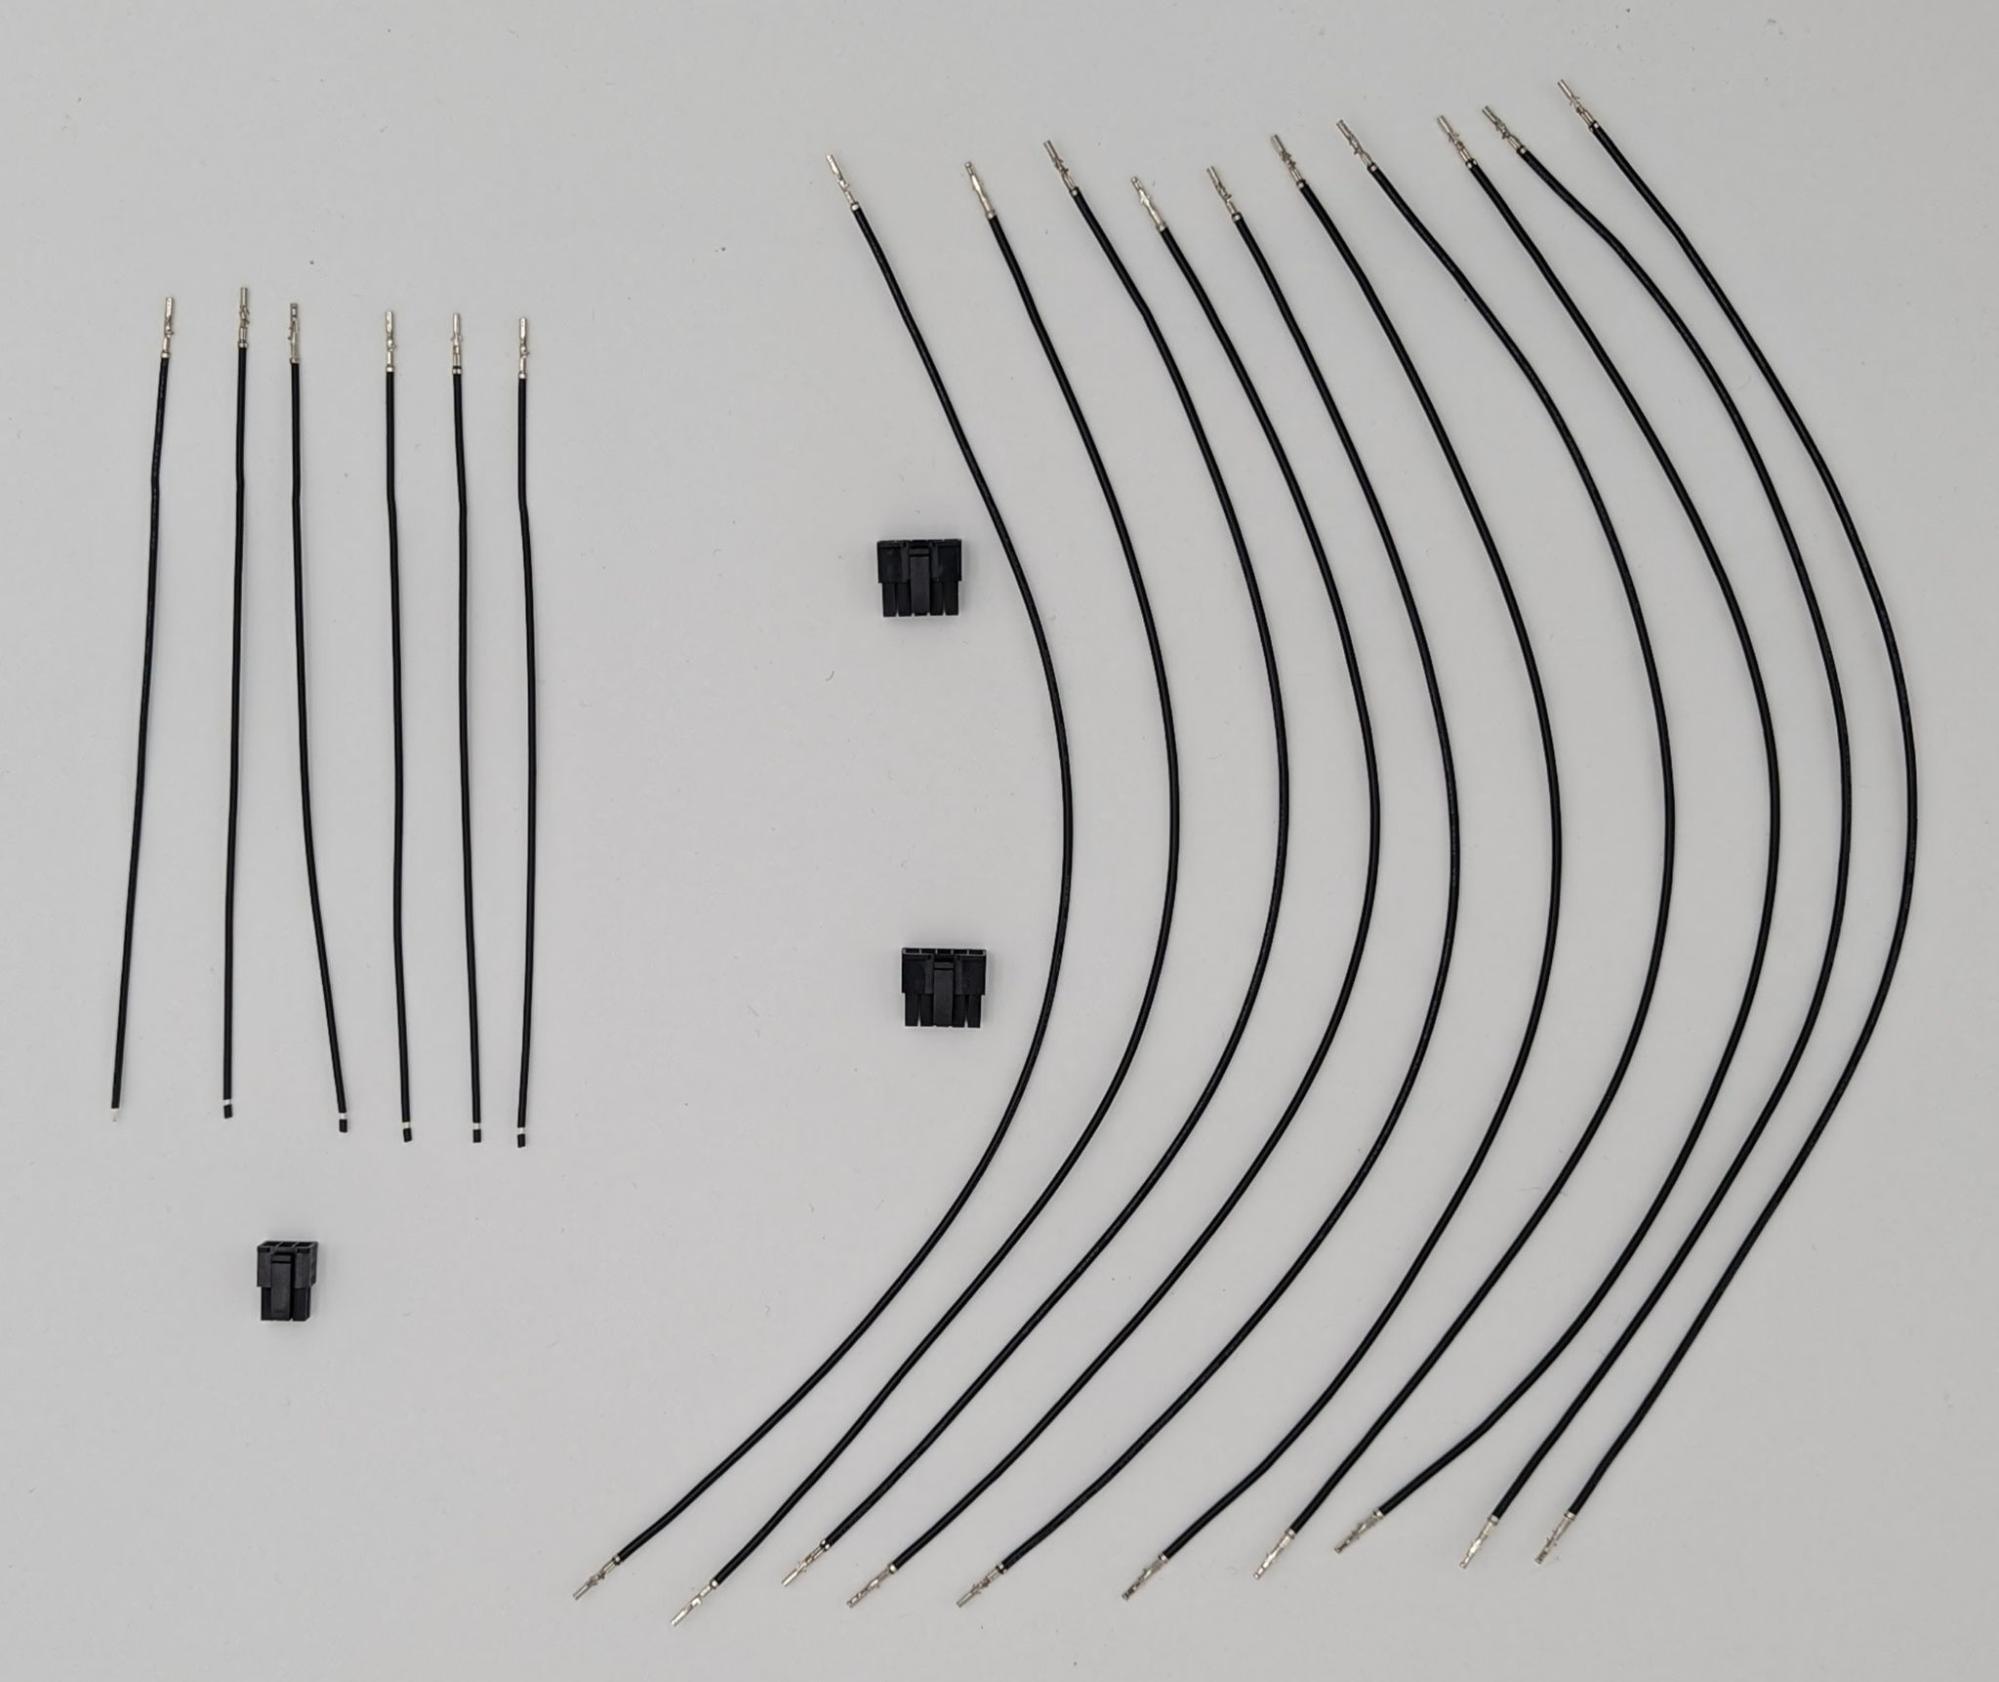
The 10-position cable between Yeti and Yak is mandatory to connect Yak to Yeti and to power the Yak board from the Yeti power supply.
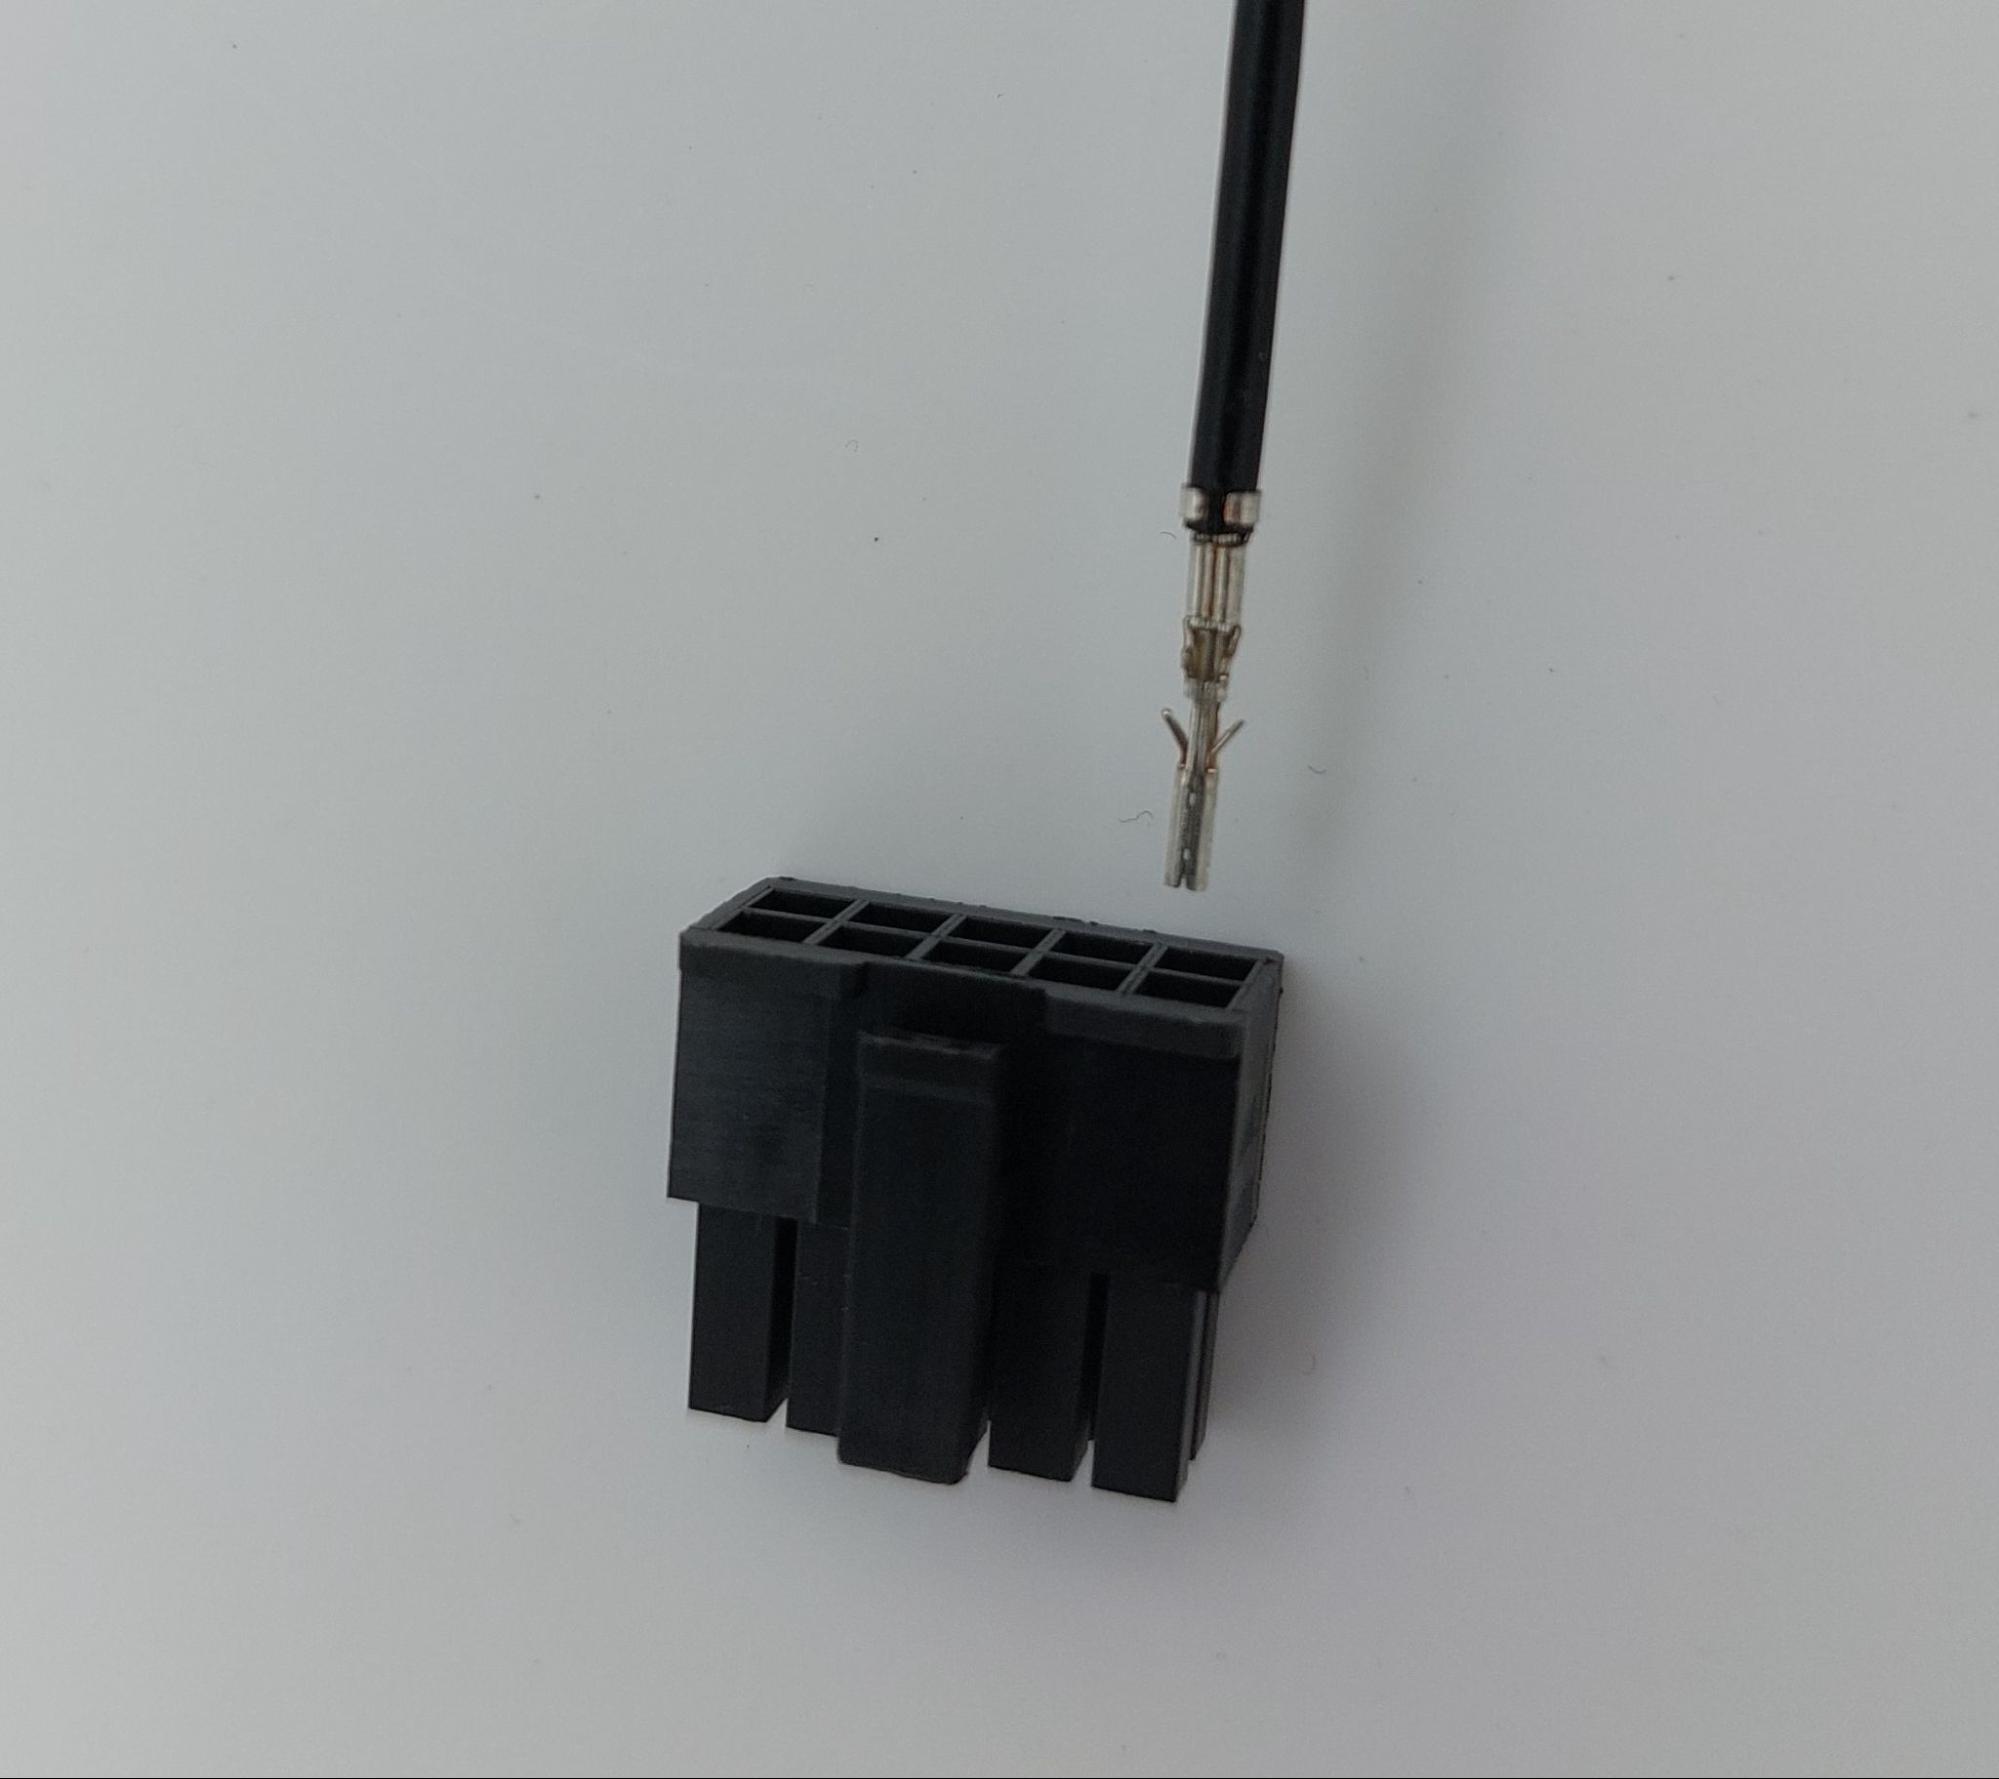
Plug in one of the crimped cables with one end into the 10-position plug. Make sure to plug in the crimp in the exact same orientation as shown in the picture above. Be aware that the crimps cannot be unplugged again from the 10-position plug. Make sure you plug in the crimps in the correct positions before actually plugging them in.
Plug in the other crimped end of the cable into the second plug. It is very important to plug in the crimps in the shown “1:1” fashion. Doing otherwise will permanently damage the Yak and/or Yeti board.
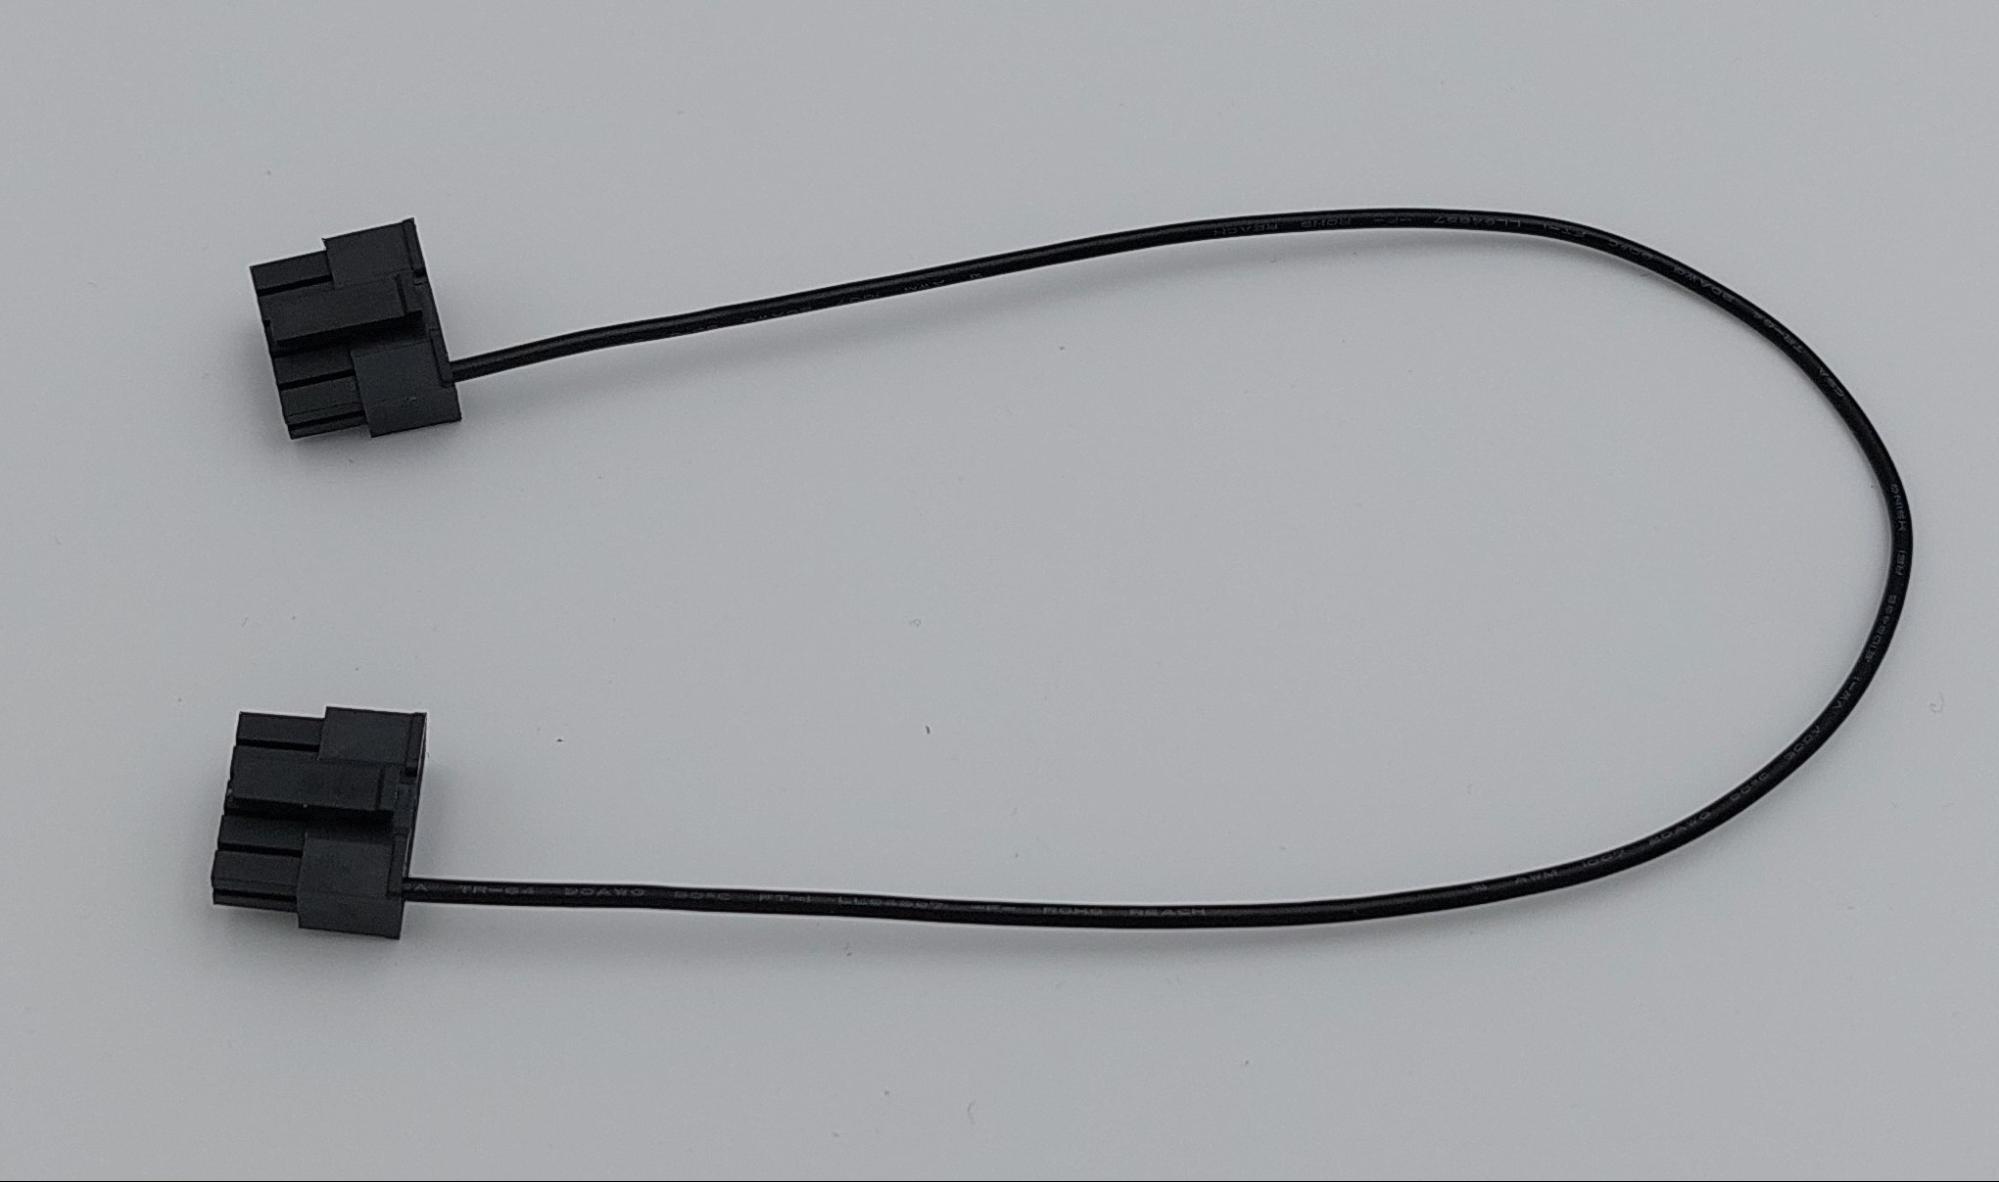
Warning
Be aware that the crimps cannot be unplugged again from the 10 position plug. Make sure you plug in the crimps in the correct positions before actually plugging them in.
Continue with plugging in all ten cables one after the other as there is less chance of getting it wrong this way.
This is how the cable looks when assembly is done:
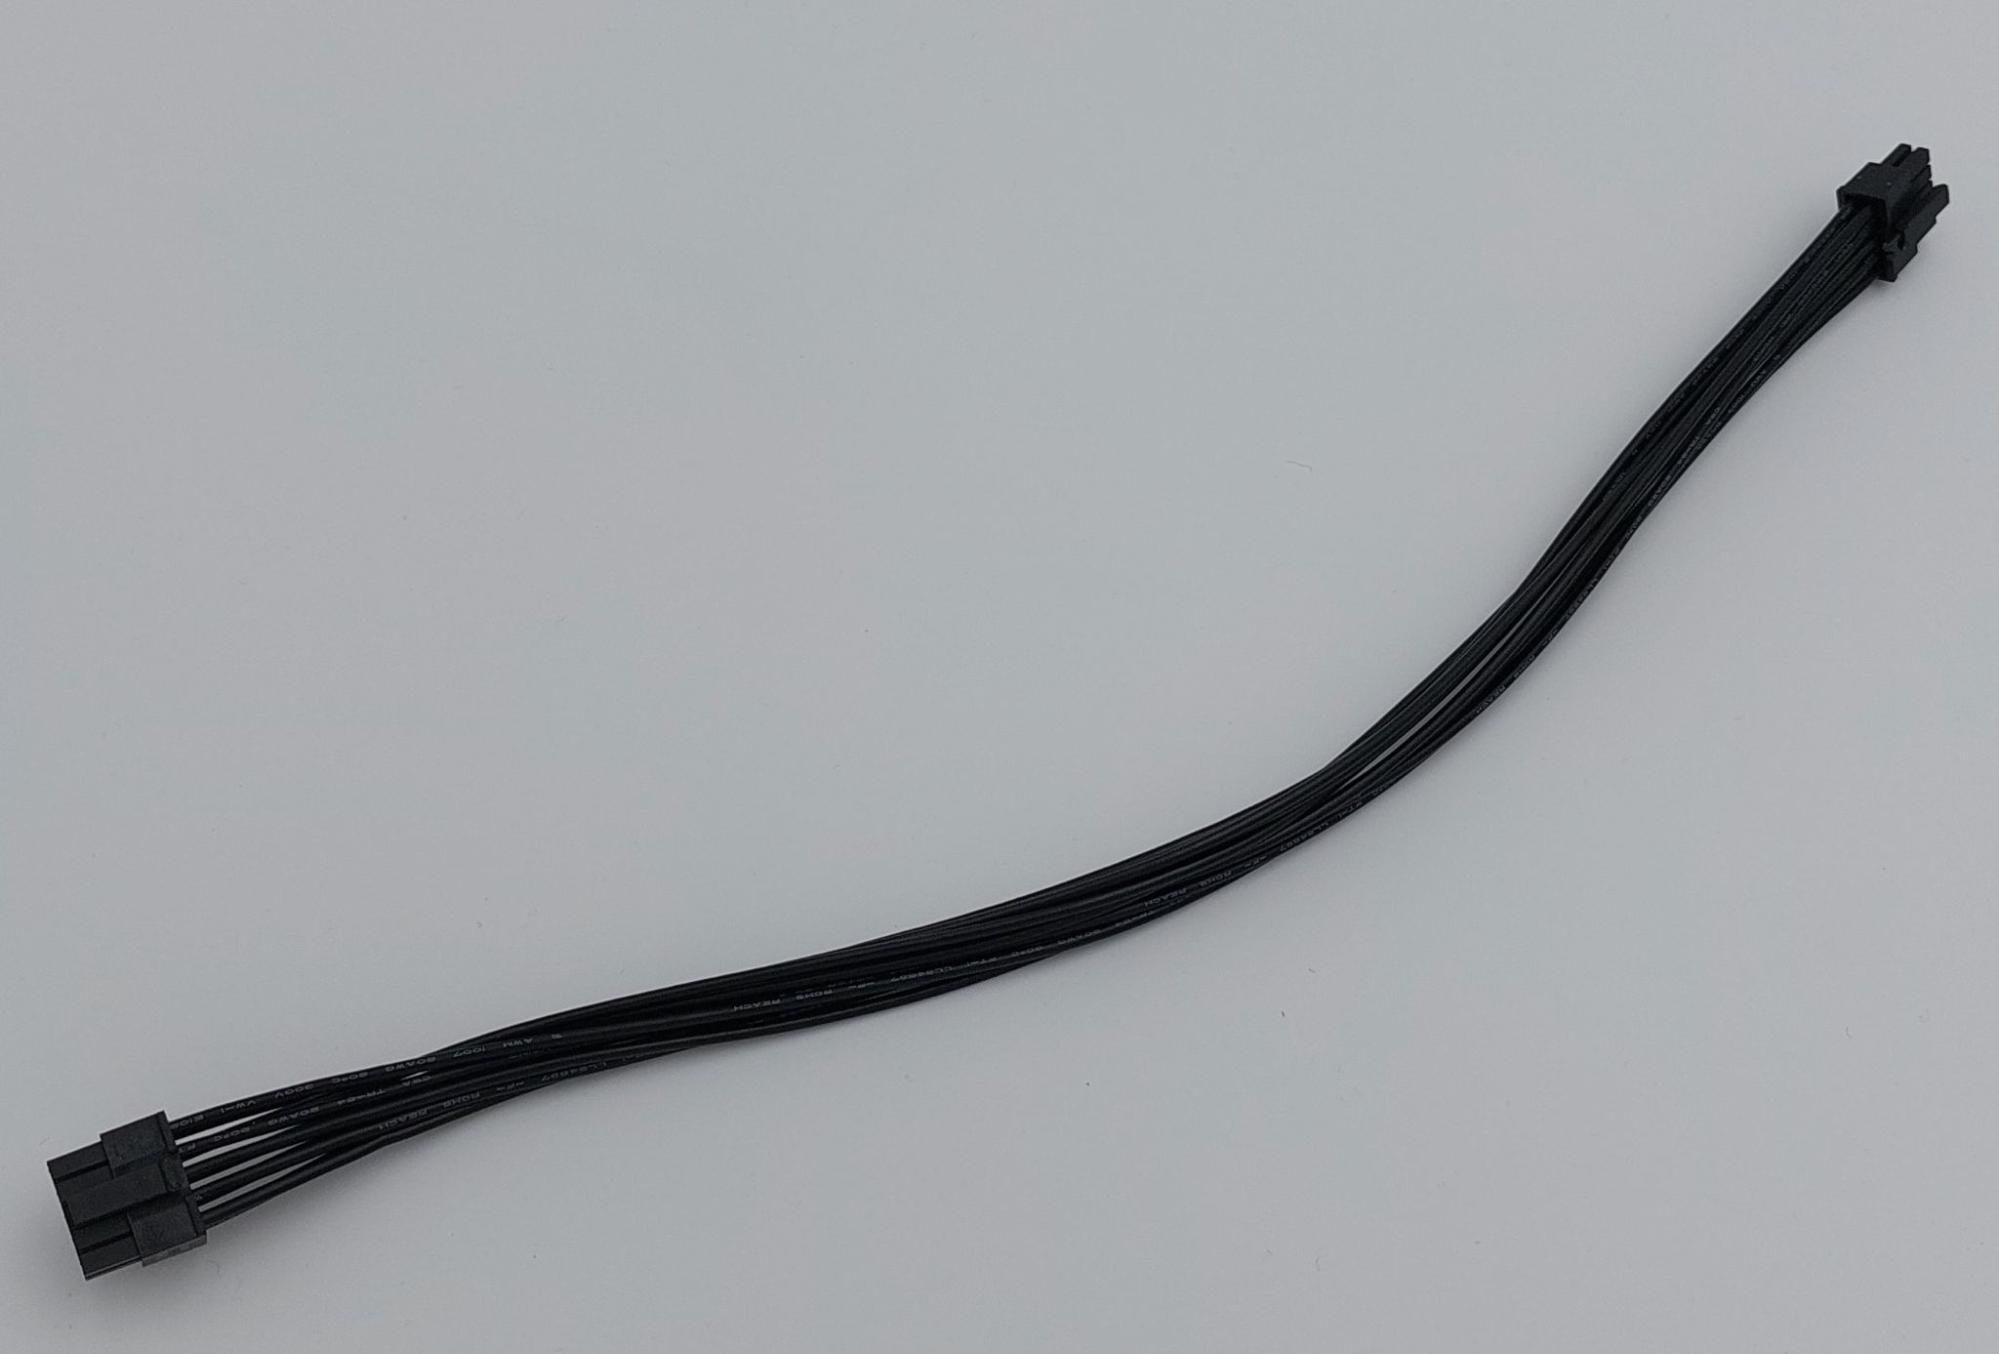
Let’s continue with the 6-position CAN + RS485 cable.
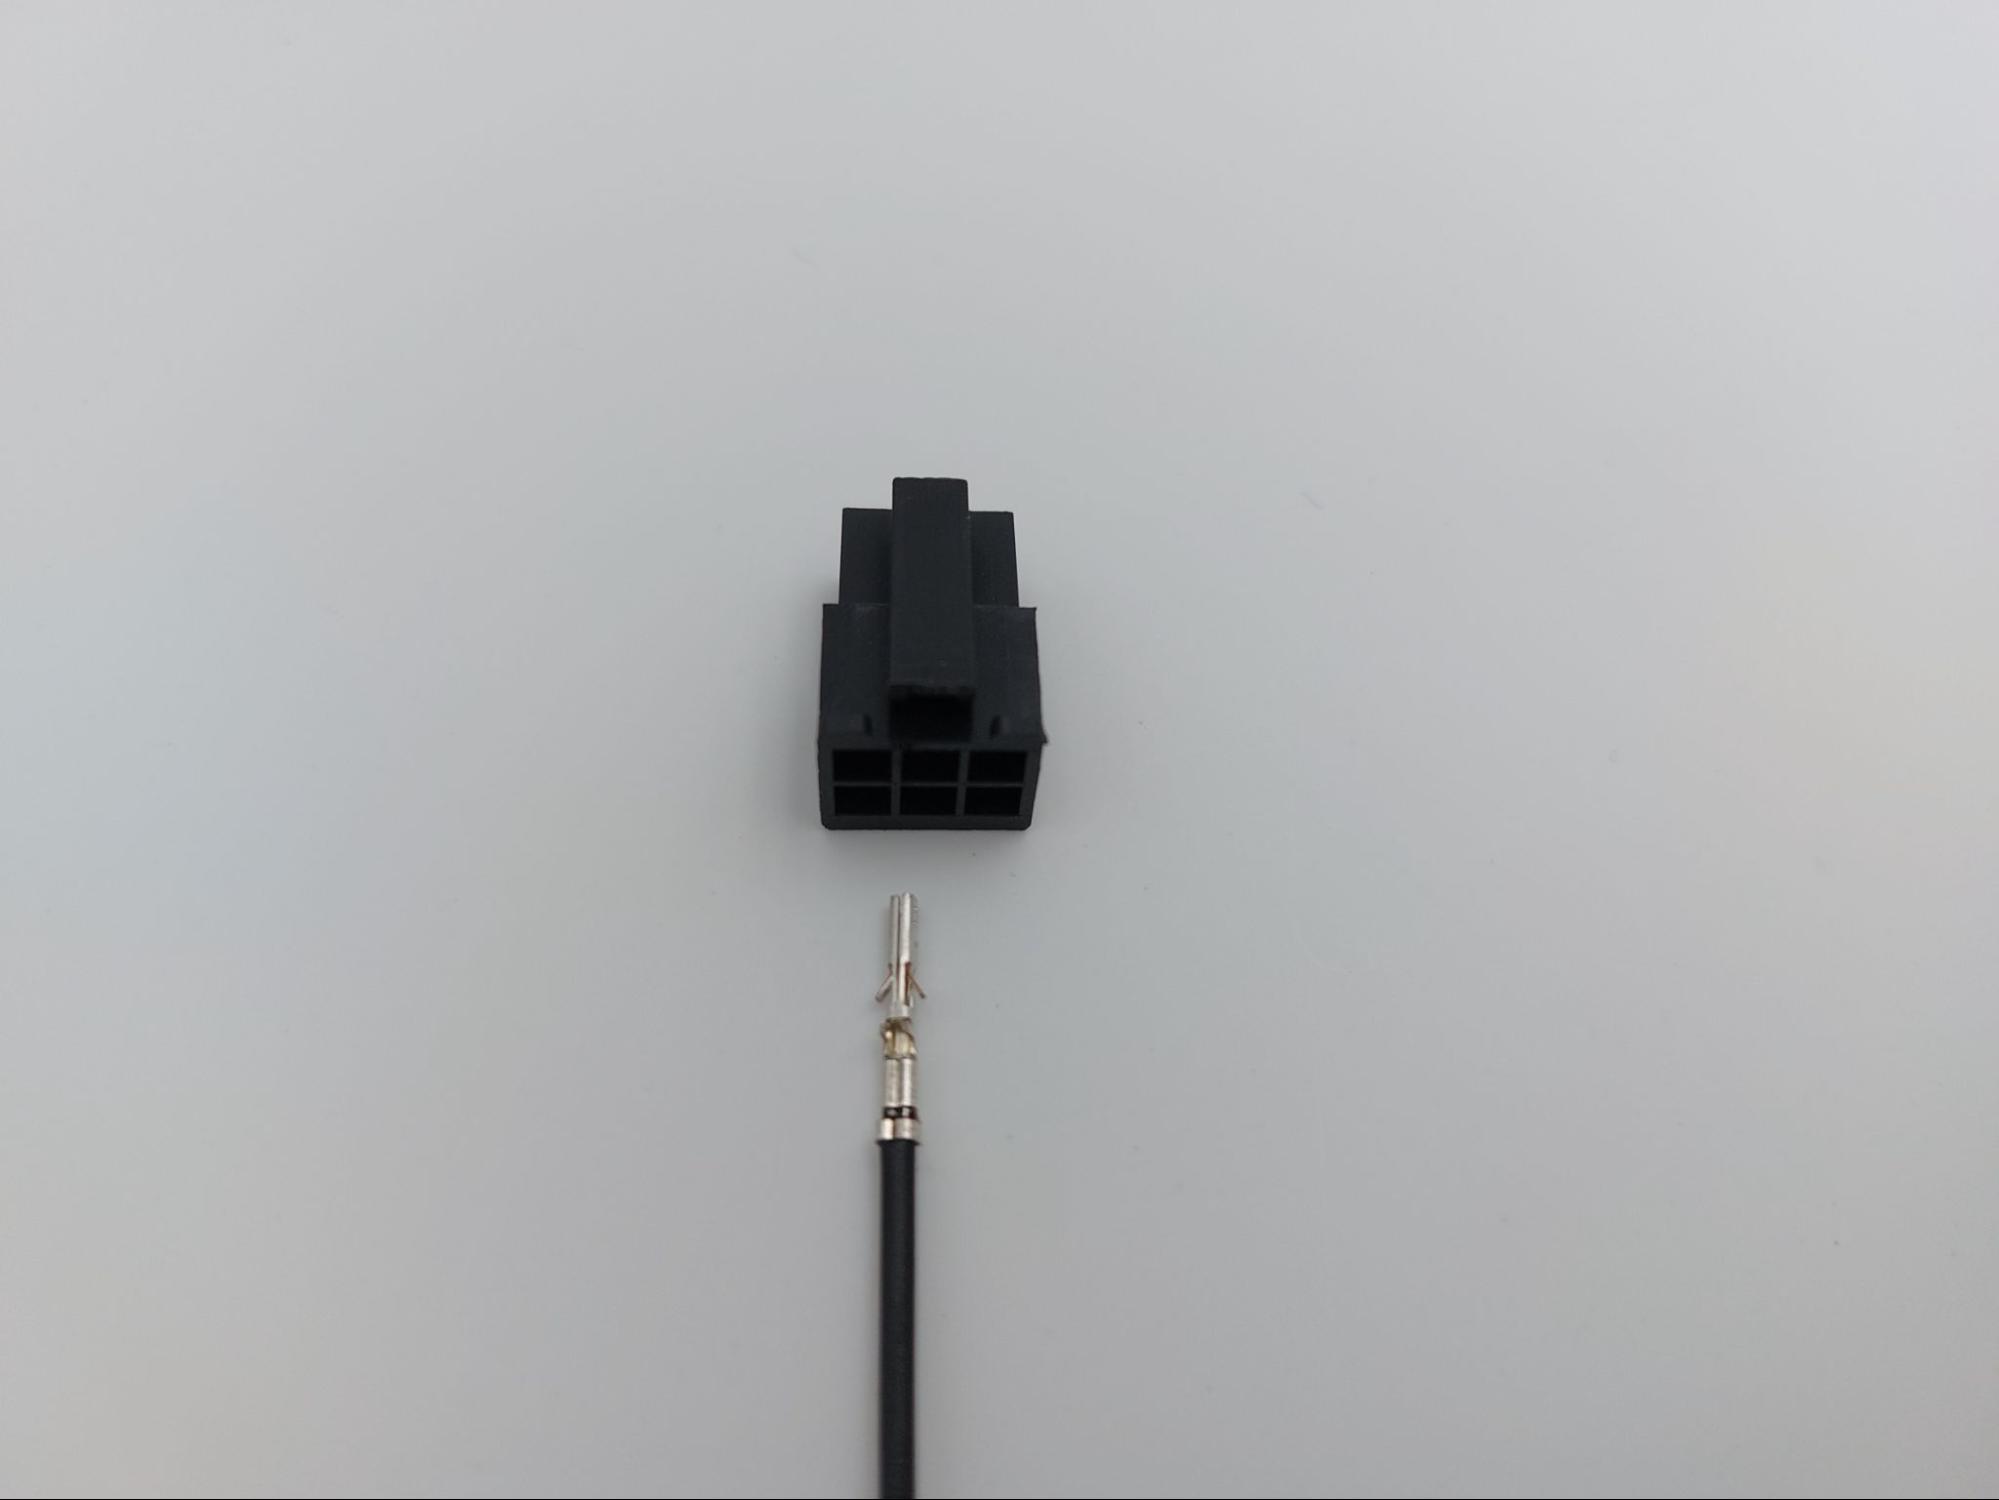
Plug in a crimped cable with one end into the 6-position plug. Make sure to plug in the crimp in the exact same orientation as shown in the picture above. Continue with plugging in all needed cables.
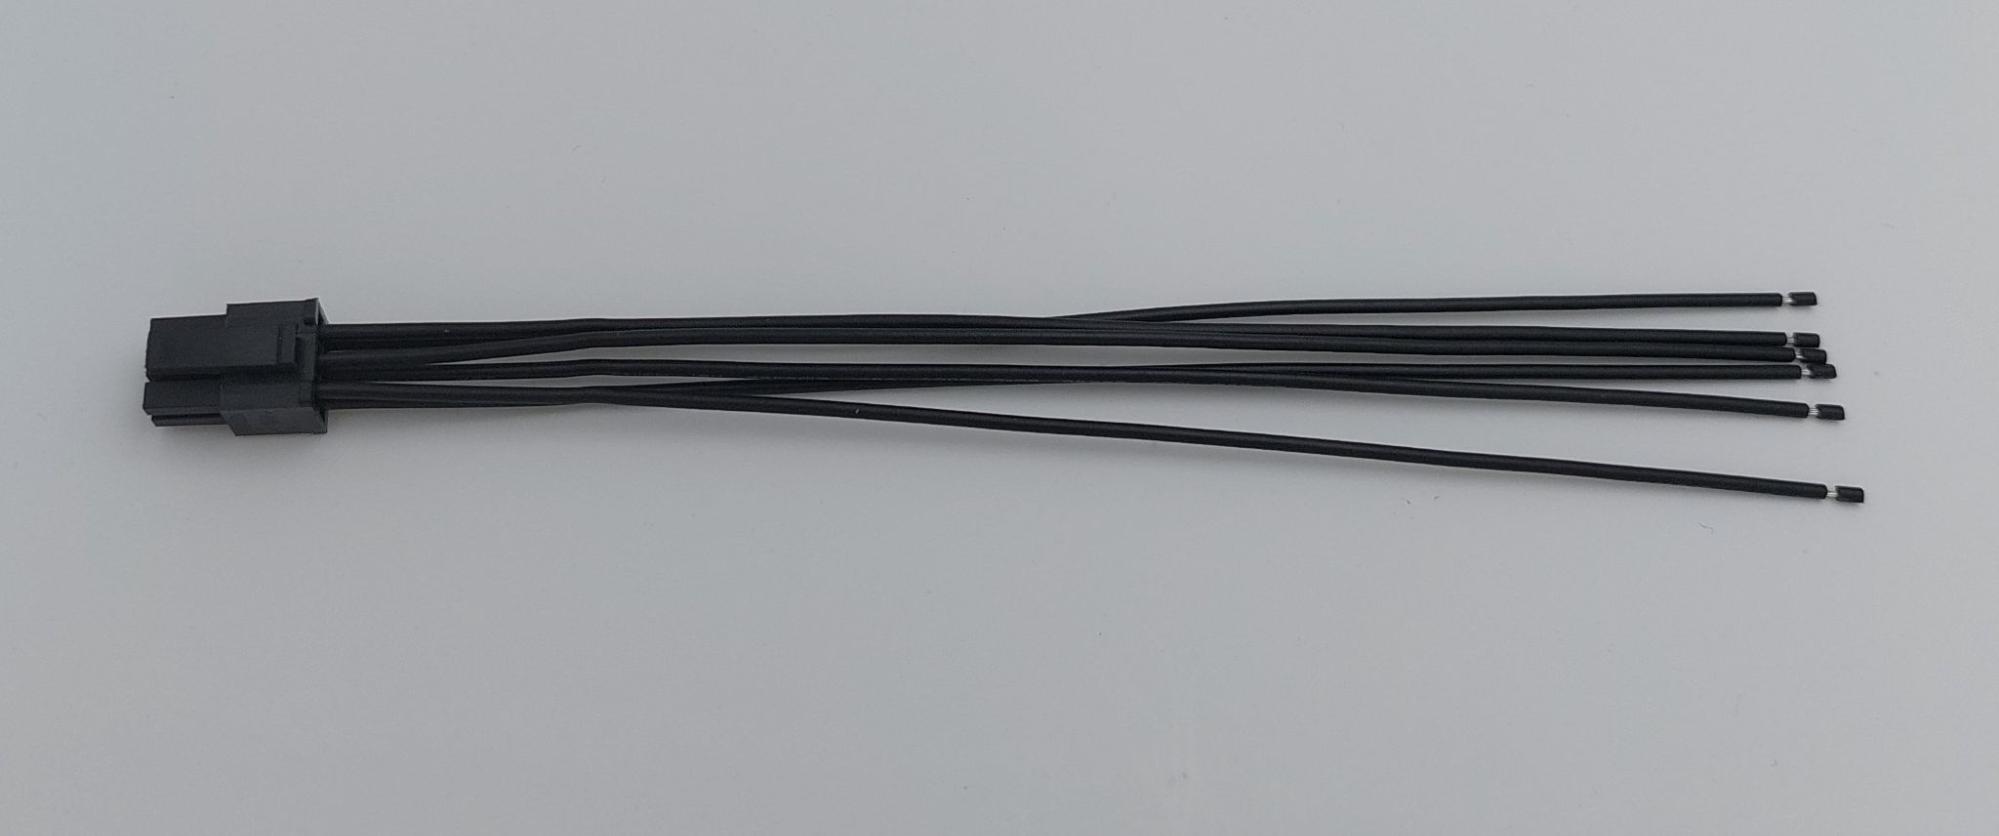
Be aware that these cables have unisolated, open ends. In case you use the 6-position cable for e.g. using the CAN bus, make sure all other not used cables are isolated to prevent damage to the Yak board.
This is how the assembled cable looks like:
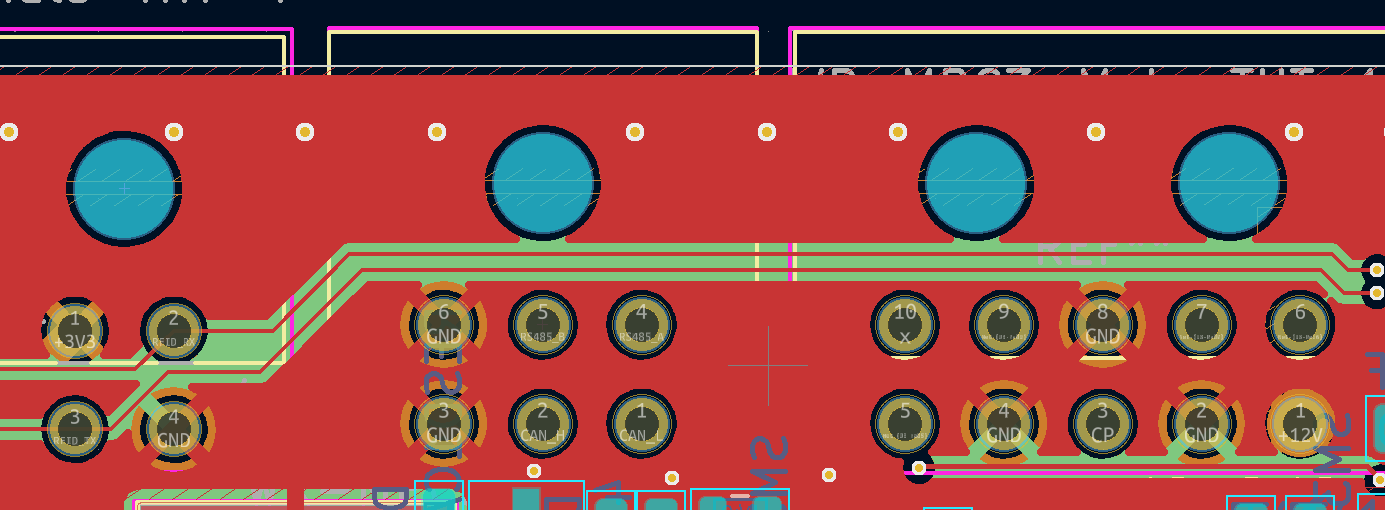
This is the pin description of the Yak board’s 4-, 6- and 10-position sockets:
8.2.5. Final Yak-Yeti-Cable-Setup
Tools needed:
ESD safe environment, e.g. ESD wrist band
ESD underlay mat
Preassembled Yak, Yeti kits and cable-set as shown in sections above
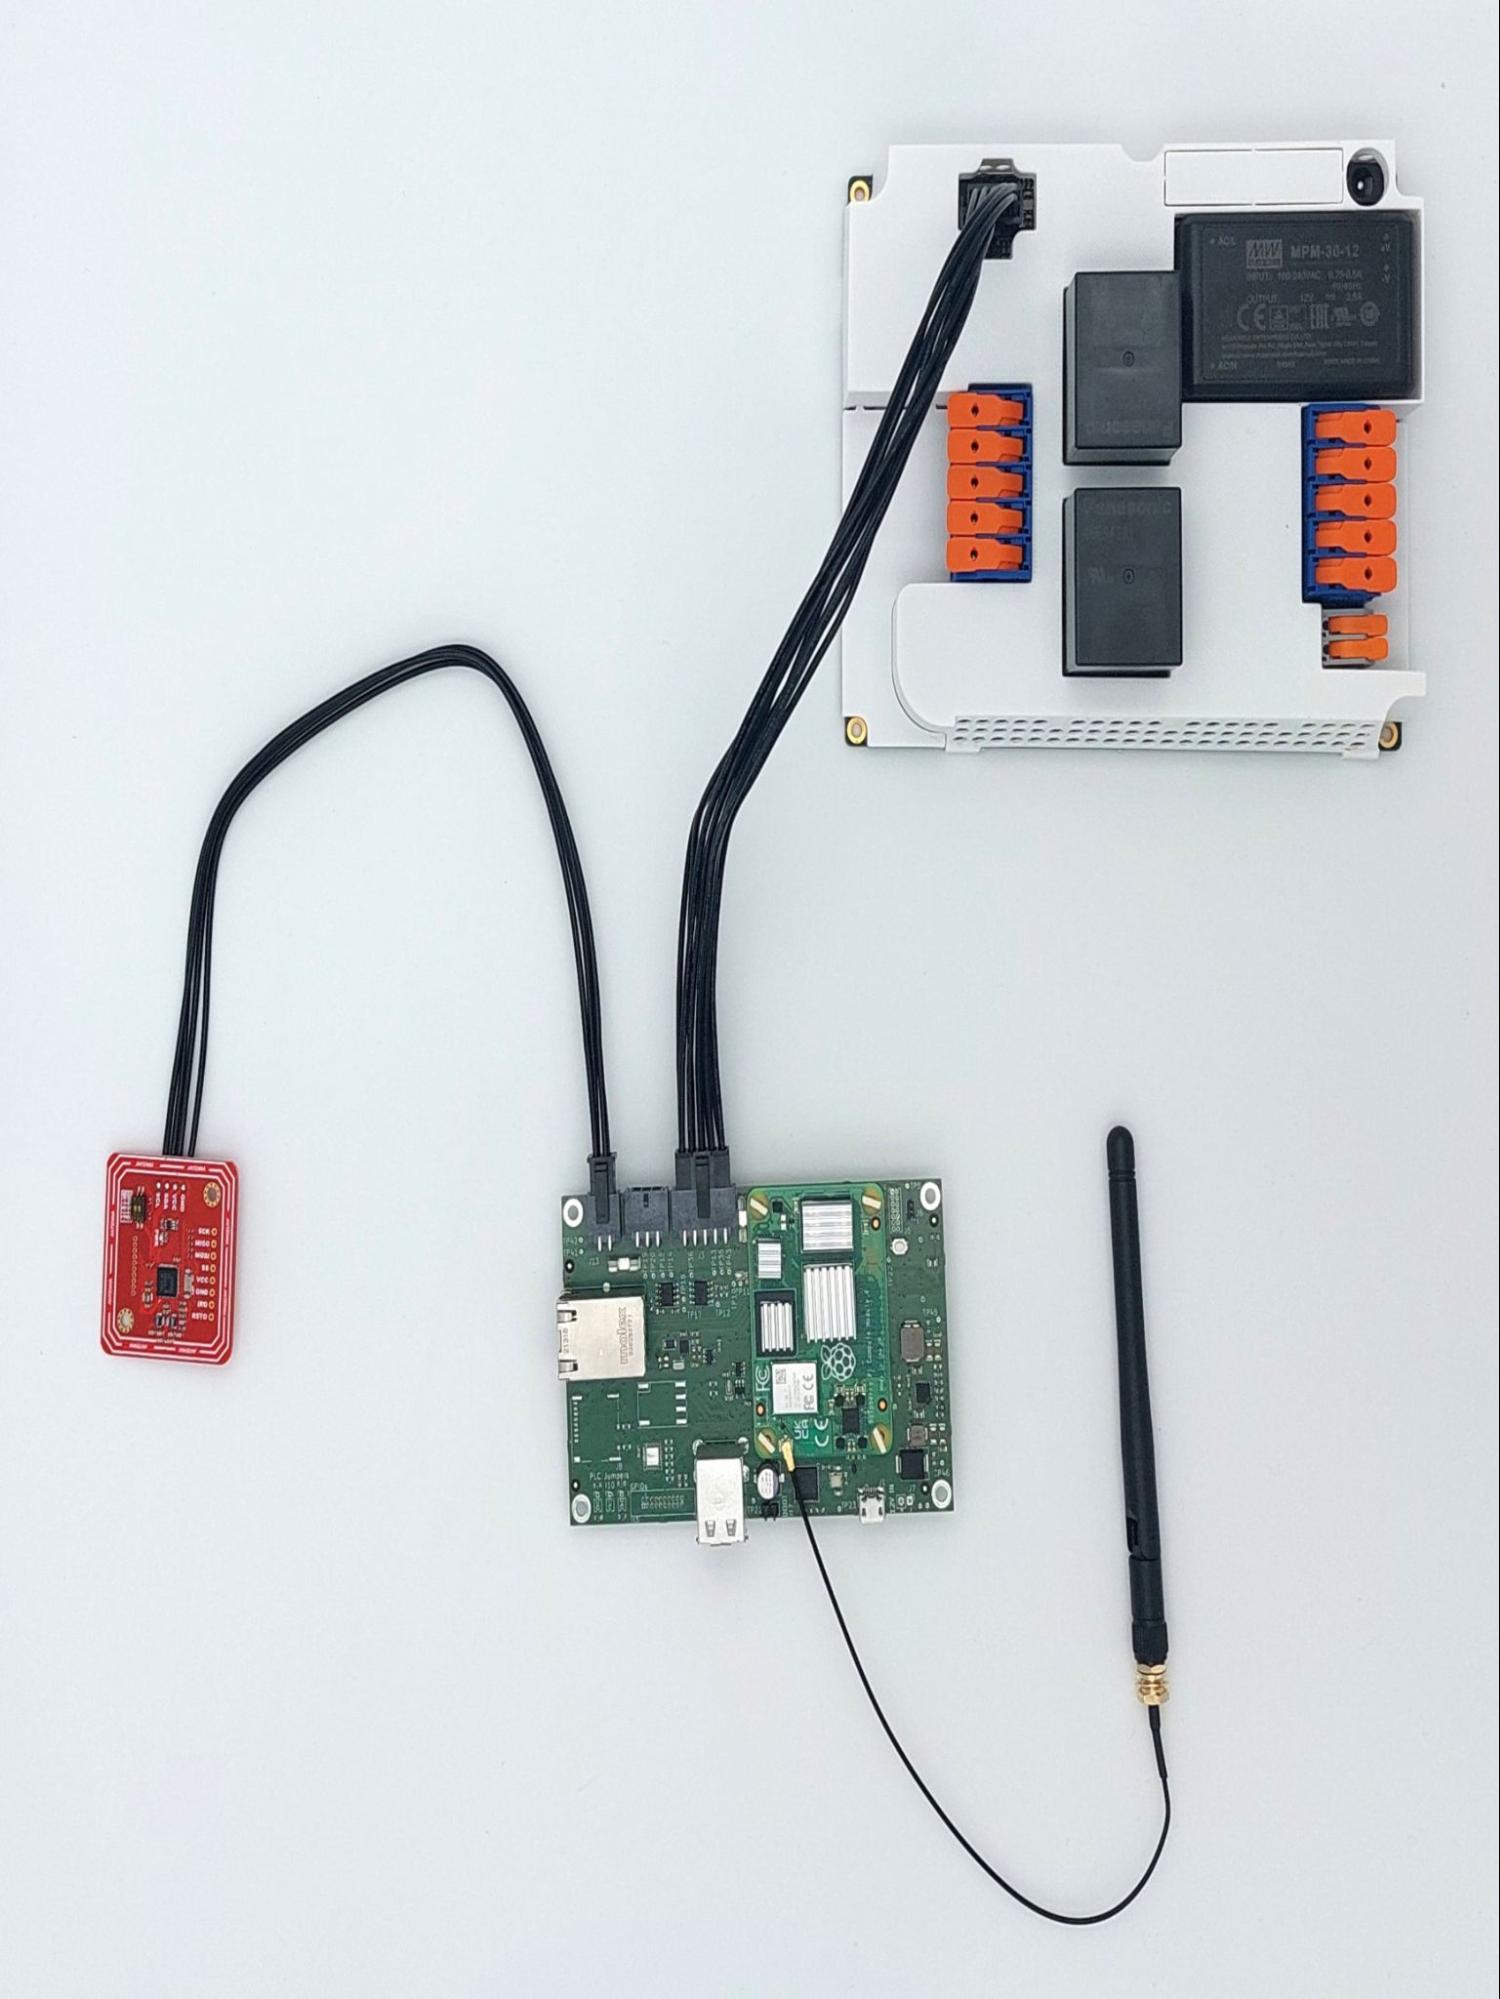
Plug in the 10-pin cable into the corresponding sockets on both ends. Plug in the 4-pin RFID/NFC reader cable. The assembly of Yak, Yet kit and cable set is completed.
When using the assembly in a “desk” environment, it is recommended to apply power through the 12V DC barrel connector shown in the upper right corner of the Yeti board in the image above. Make sure the WiFi antenna does not touch any other open PCB parts to prevent damage to the boards.
8.2.6. Raspbian
BelayBox uses Raspian (a debian flavour for the Raspberry Pi) as a main operating system for development purposes. For deployment on real products you should consider using Yocto or similar instead.
For further information like the partitioning scheme and updating Raspbian, section BelayBox Further Information.
8.2.7. EVerest
EVerest is the charging software on the BelayBox that controls charging, cloud access, authorization, energy management, the display app etc.
8.2.7.1. Integration into Raspbian
EVerest is installed under /opt/everest. Since this folder is in the
root partition it is also updated with the regular online update.
The systemd service everest.service starts EVerest at boot if no custom
everest installation is found under /mnt/user_data/opt/everest.
- The systemd service
everest-dev.servicestarts EVerest at boot from /mnt/user_data/opt/everestif that exists.
The systemd service display-app.service starts the flutter based
display application.
8.2.7.2. Update Yeti’s microcontroller firmware
The Yeti Power Board is controlled by an STM32 microcontroller that is responsible for the lowest level state machine and all electrical safety. In the future updates will be installed automatically. For now they can be installed manually.
The firmware has been open sourced, see Yeti Firmware
In your normal workflow, updating this firmware is not needed.
The microcontroller is not protected (remember this is a dev kit and not a real product). You can use the update tool that comes with the Yeti EVerest driver module:
/opt/everest/bin/yeti_fwupdate /dev/serial0 new-firmware.bin
This will reboot the microcontroller in firmware update ROM bootloader and uses stm32flash tool to upload the new firmware.
8.3. Developing with EVerest and BelayBox
You can use make or ninja with cmake. The examples here are given with make.
8.3.1. Setup cross compile environment
First, make sure you have successfully built EVerest natively on your laptop as described here: https://github.com/EVerest/everest-core#everest-core
Download and untar the bullseye-toolchain:
wget http://build.pionix.de:8888/release/toolchains/bullseye-toolchain.tgz
tar xfz bullseye-toolchain.tgz
Change directory to everest-core in your workspace e.g.:
cd ~/checkout/everest-workspace/everest-core
Cross-compile by changing the given paths accordingly:
cmake \
 -DCMAKE_TOOLCHAIN_FILE=/full-path-to/bullseye-toolchain/toolchain.cmake \
 -DCMAKE_INSTALL_PREFIX=/mnt/user_data/opt/everest \
 -S . -B build-cross
Now build EVerest with the following commands:
make -j$(nproc) -C build-cross
make -j$(nproc) DESTDIR=./dist -C build-cross install
8.3.1.1. Deploy a custom EVerest on BelayBox
The binaries are now installed under build-cross/dist.
You can use rsync within the build-cross folder to copy the files to
BelayBox:
rsync -a build-cross/dist/mnt/user_data/opt/everest/* everest@the.ip.add.res:/mnt/user_data/opt/everest
The first time you need to create the folder /mnt/user_data/opt/everest
on the BelayBox before syncing
(ssh everest@the.ip.add.res mkdir -p /mnt/user_data/opt/everest)
You can also copy to another folder on the BelayBox, but using
/mnt/user_data/opt/everest will make your new custom everest installation
auto start at boot (see everest-dev.service). This way you can have a
custom installation and still use the online updates for the base system.
If you do it for the first time, reboot BelayBox so that
everest-dev.service is used from now-on instead of everest.service.
8.4. BelayBox Further Information
8.4.1. Reference Cheat Sheet
rw: make root partition read/writable
ro: make it read only again
/mnt/user_data/etc/wpa_supplicant/wpa_supplicant.conf: file containing wifi settings
/mnt/user_data/opt/everest/<crosscompiled everest binaries> force the use of custom everest build or config by automated start of
everest-dev.serviceinstead ofeverest.service/mnt/user_data/etc/update_channel contains either stable or unstable to define release channels
/mnt/user_data/etc/wireguard/wg0.conf for a wireguard VPN configuration
/mnt/user_data/user-config/config-deploy-devboard.yaml for a persistent user config containing only the diffs to the default config.
to stop automatic updates: rw; sudo systemctl disable ota-update.service
- /mnt/user_data/etc/mosquitto/conf.d: here you can add additional config files for the mqtt broker. For example a “public_mqtt.conf” file with the following contents:
listener 1883allow_anonymous trueto allow anonymous external connections to the mqtt broker for debugging purposes
sudo journalctl -fu everest.service: watch the output of everest.servicesudo journalctl -fu everest-dev.service: watch the output ofeverest-dev.servicesudo /opt/everest/bin/manager --conf /opt/everest/conf/config-deploy-devboard.yaml: run EVerest in the terminal. Make sure the systemd service is not running.
8.4.2. Raspbian partitioning scheme
BelayBox uses a different partitioning scheme then vanilla raspian. The reason for this is it supports A/B root partitions for updates. This way an update can be downloaded and installed while the Box is in operation, even while charging.
When rootfs A is booted, new updates will be installed to partition B and vice versa. After succesfull installation an atomic flag is set in the Raspberry Pi bootloader to try one boot of the newly installed system.
If it boots succesfully, the changes are made permanent. If not, it automatically falls back to the previous version on the next boot.
The SD card has the following partitions:
Device         Boot    Start      End  Sectors  Size Id Type
/dev/mmcblk0p1          8192  1056767  1048576  512M  c W95 FAT32 (LBA)
/dev/mmcblk0p2       1056768 14688255 13631488  6.5G 83 Linux
/dev/mmcblk0p3      14688256 28319743 13631488  6.5G 83 Linux
/dev/mmcblk0p4      28319744 30564351  2244608  1.1G  f W95 Ext'd (LBA)
/dev/mmcblk0p5      28327936 28459007   131072   64M 83 Linux
/dev/mmcblk0p6      28467200 30564351  2097152    1G 83 Linux
/dev/mmcblk0p1: Boot partition.
This is used for both root partitions due to limitations
in the Raspberry Pi bootloader. It contains two subdirectories
(system0 and system1) with the boot files of the two installed root partitions.
/dev/mmcblk0p2: Root partition A. Read only.
/dev/mmcblk0p3: Root partition B. Read only.
/dev/mmcblk0p4: Extented (container for 5-6)
/dev/mmcblk0p5: Factory data.
The contents will be written once during production and should not be changed.
Mounted under /mnt/factory_data
/dev/mmcblk0p6: User data.
Only writable partition. All data generated during the use of the box will be
stored here. Also various configuration overrides can be set here, see Cheat
sheet.
Mounted under /mnt/user_data.
8.4.3. Using online updates
BelayBox comes with a very simple online update tool that is controlled by two systemd services:
ota-update.service: This service starts a shell script that checks for
online updates on Pionix update servers. It is triggered by the second systemd
service:
ota-update.timer: This is the systemd timer unit that starts
ota-update.service on regular intervals.
To disable online updates use sudo systemctl disable ota-update.service.
The online update updates always the full root partition. All data that needs
to survive the update needs to be stored in /mnt/user_data.
The root partition should normally never be modified, it is read only. All changes will also be lost on the next online update.
If you still want to modify something, use the rw and ro commands
to re-mount root read-write/read-only.
In rw mode you can e.g. use sudo apt install ... to install new software.
Disable online update if you need the changes to stay.
8.4.4. Factory reset
For a factory reset of the BelayBox, the following partition has to be formatted:
/mnt/user_data/
Before that, all services accessing that partition have to be stopped:
sudo systemctl stop everest
sudo systemctl stop nodered
Hint
Depending of your setup, the EVerest service could also be called everest-dev or everest-rpi instead of just everest.
After this, unmount the partition:
sudo umount /dev/mmcblk0p6
Finally, formatting can start:
sudo mkfs -t ext4 /dev/mmcblk0p6
Confirm with “y” as soon as you are happy with losing all previous configuation settings (e.g. WiFi credentials).
After formatting, reboot the BelayBox to let it setup the factory default configuration:
sudo reboot